Refried Beans

19 Feb

Last summer, I posted about getting pinto beans at a local bean company, Bonita Bean.  I had used some previously to make refried beans for a potluck, but never got around to sharing how I made them.  These beans are pretty good that they mostly just need to be cooked and mashed, with a little bit of seasoning, if you like.  We thought that was a little bland, so I made them this time with some additions, and it came out better for us.

Refried Beans


Refried Beans

What you need:

1 cup dry pinto beans
1/4 cup lard or olive oil (I used olive oil)
1 cup onion, finely chopped
2 cloves garlic, minced
1 tablespoon chili powder
1 teaspoon ground cumin
1/2 teaspoon salt
Dash cayenne pepper
1/2 teaspoon oregano

How to make it:

First, cook the beans one of 1 ways:

Stove top:
Rinse beans and put in a heavy pot.  Add enough water to cover beans with 1-2 inches of water.  Bring to a boil, then cover and reduce heat to a simmer.  Cook for 1 1/2 to 2 hours.  Beans are done when they are soft and skins have begun to break.

Slow cooker:
Rinse beans and add to slow cooker.  Add 3 cups water.  Cook on high for 8 hours until beans are soft and skins have begun to break.

Strain beans from the cooking water.

In a large skillet, heat lard or olive oil over medium-high heat.  Add onions and cook until soft and translucent.  Add garlic, chili powder, cumin, salt, and cayenne pepper.  Continue cooking and stirring about a minute, until fragrant.  Add in the cooked beans and 1/4 cup fresh water.  Mash with a potato masher or back of a heavy spoon until a rough paste is formed.  Continue to cook for 5-10 minutes, adding more water 1 tablespoon at a time as needed to keep beans from drying out.


Gyros Meatloaf with Tzatziki

15 Feb

Unfortunately, the Greek restaurant we had here in town closed down, and even though there are a few places that serve gyros still, I decided to keep working on my own version at home.  I have made Gyros Burgers before, but wanted to try it as more of a meatloaf than burgers so it could be sliced and put in pita pockets.  Now, the downside to meatloaf is that it takes a while to cook without getting too dry.  So, now, when I have time I can do meatloaf, if I’m pressed for time, I can do burgers.  I also made tzatziki for the first time tonight to go with this.  It was perfect!  My husband is usually not a fan when we get gyros when eating out.  He says it’s too messy, but this was thicker, more dip-like, so it wasn’t dripping all over when eating it.  Tonight, I served it with Sweet Potato Chips, which were a nice compliment to the gyros.

Gyros Meatloaf with Tzatziki and Sweet Potato Chips

Gyros Meatloaf with Tzatziki

What you need:

Gyros Meatloaf:
1 pound ground beef and 1 pound ground lamb or 2 pounds ground beef
1 small onion
4 cloves of garlic, minced
1 teaspoon dried savory
1 teaspoon allspice
1 teaspoon dried oregano or 2 teaspoons fresh oregano
1/2 teaspoon salt
1/4 teaspoon ground black pepper
Dash of ground cumin

Tzatziki (original recipe with more step by step pictures at Daily Cynema:
24 oz container plain Greek yogurt
1 seedless cucumber, peeled
3 cloves of garlic, crushed
1 tablespoon olive oil
1 tablespoon red wine vinegar
1 teaspoon dried dill weed
1 teaspoon salt
Ground black pepper to taste

How to make it:

Put the onion in a food processor for a few seconds.  Remove into paper towels and squeeze out excess liquid.  Place onions in a mixing bowl, and stir in remaining meatloaf ingredients.  Cover and refrigerate for 1 hour.

Preheat oven to 325 F

Put the meat mixture back into the food processor and process for about a minute or until mixture becomes like a fine paste.  Press meat mixture into a 9 x 5 loaf pan, making sure there are no air pockets.  Place loaf pan in a larger roasting pan, and pour boiling water into the roasting pan until there is enough to reach the middle of the side of the loaf pan, creating a water bath for baking.

Water Bath for Gyros Meatloaf

Carefully place in oven and bake in the preheated oven for 60-70 minutes, or until meat reaches an internal temperature of 170 F.  Pour out any excess fat, and slice thinly to serve.

Finished Gyros Meatloaf

While meatloaf is baking, grate the peeled cucumber and squeeze out the excess liquid.  Put in a mixing bowl and stir in remaining tzatziki  ingredients.  Put in a container and keep refrigerated until ready to use (I just returned it to the container the Greek yogurt came in).  Serve with the gyros meatloaf in pita bread with lettuce, tomato, and red onion, if desired.

Tzatziki

Orange Honey Sesame Chicken

14 Feb

Sesame Chicken has been a favorite in our house for quite a while now.  It’s a go to dish when we have vegetables to use up that are good in a stir fry, or just as a chicken dish to throw in the weekly meal plan.  I have gotten a ton of oranges lately from Bountiful Baskets and Sunizona FarmBoxes, so I decided to try to incorporate fresh squeezed orange juice somehow.  Also, the Sesame Chicken uses white sugar, but this time I decided to use honey in its place.  I have a lot of honey from a Bountiful Baskets 12 pound bucket to use, plus it’s more natural than the sugar I have.  It turned out really great!  It’s not overly orange tasting, which is what I was going for.  I also added in some fresh grated ginger, which I think I may do with the Sesame Chicken in the future as well.  (Quick tip for ginger, keep it in the freezer to keep longer, then just take it out, grate what you need, and put it back!)

Orange Honey Sesame Chicken


Orange Honey Sesame Chicken

What you need:

1/4 cup all-purpose flour
4 boneless, skinless chicken breast halves, cut into 1″-2″ pieces
1 Tbsp olive oil
1/4 cup reduced-sodium soy sauce
1/4 cup honey
1/2 cup fresh squeezed orange juice
1/2 tsp dark sesame oil
2 Tbsp sesame seeds, toasted
1/4 teaspoon fresh grated ginger
Veggies of your choice (tonight I used broccoli and green onions)
Cooked rice

How to make it:

Place flour and chicken in a gallon size zipper bag.  Shake to coat chicken in flour.  Heat olive oil in a large non-stick skillet over medium high heat. Add the chicken to the skillet in batches and cook, stirring occasionally, for 3 to 4 minutes, or until white and no longer pink.

Meanwhile, in a medium-sized skillet, combine the soy sauce and honey in the skillet. Cook, stirring occasionally, until the honey is mixed well with the soy sauce. Stir in the orange juice, grated ginger, sesame oil and sesame seeds.  Pour over the chicken in the larger skillet and stir to coat.

Add in any chopped veggies you want.  For this batch, I used just broccoli.  Other times I have used different combinations of broccoli, onion, green, yellow, and red peppers, shredded carrots, bean sprouts, snow peas, water chestnuts, and mushrooms.  Cover your skillet and cook until veggies have softened.  I tend to leave the veggies a little crispy still because my husband likes them still crispy.  After other veggies have softened, add the green onions.

Serve over cooked rice.

Note: You can buy toasted sesame seeds, usually with in the section with other Asian grocery items.  If you can’t find them, to toast sesame seeds, place in a dry skillet and toast, shaking the pan, over medium high heat for a minute or so, or until fragrant and lightly browned. Do this first and cook the chicken in the same skillet to pick up more sesame flavor.  Also, if you are using a lot of veggies, you may want to double the ingredients for the sauce so there is some for the veggies.

Zaycon Foods Hot ‘n Spicy Buffalo Wings

10 Feb

My husband loves wings.  So, when Zaycon Foods listed an event for Hot ‘n Spicy Buffalo Wings, I decided I would order since $2.99 per pound was a decent price.  This isn’t the greatest picture, but here are two of the four 5 pound bags:

Zaycon Foods Hot 'n Spicy Buffalo Wings

They are fully cooked, so really it’s just a matter of heating them up.  I cook them in the oven, at 400 F, for about 15 minutes.  The ingredients, nutritional information and cooking directions can be found here.

They are a little smaller than wings we’ve had dining out, but that’s not a big deal for us.  They really are very tasty, I’d say about a mild or medium.  I have a very low tolerance for spiciness, and I can tolerate these without too much pain.  My husband seems to be enjoying them as well.  I don’t think they will last long at our house!

Cinnamon French Toast

3 Feb

Cinnamon French Toast


I love French toast, but it’s not something I make all too often.  My husband had bought a loaf of artisan French bread for $0.99 at Safeway, one of our Just for U personalized deals on our Club Card.  Usually, we just have the bread with butter with our dinner, but since I have the new electric griddle, I decided to try it out making French toast today.  It was perfect to get all the slices on at once and to cook them all evenly:

Electric griddle with French toast cooking

It’s been a while since I’ve made French toast, so I looked up a few recipes and came up with this combination.  I put a little powdered sugar on top, and served it with cut strawberries and bananas.  My older daughter thought it was beautiful!  And delicious.


Cinnamon French Toast

What you need:

8 slices of bread, preferably French bread cut 1/2″ – 1″ thick
1 cup milk or half and half
3 large eggs
2 tablespoons honey, warmed in microwave about 20 seconds
1 teaspoon cinnamon
1/4 teaspoon vanilla extract

How to make it:

In a bowl, whisk together, milk, eggs, honey, cinnamon, and vanilla extract.  Pour mixture into a pie pan.

Dip each slice of bread in the mixture, allowing both sides of bread to soak for a few seconds.  Place each slice in a skillet or on an electric griddle and cook until golden brown on each side, about 2-3 minutes for each side.  Serve with powdered sugar, syrup, and fresh fruit, if desired.

A Kitchen-y Christmas: Kid Version

3 Feb

My daughters both love to cook with me.  Any time in the kitchen, they want to help any way they can.  Naturally, because of her love for cooking, my older daughter wanted an Easy Bake Oven for Christmas.  I had an Easy Bake Oven when I was a kid and I thought it was really cool.  Until I realized it’s just a light bulb in a plastic oven, and it makes the tiniest, almost tasteless desserts.  So, we talked it over, and we decided that it might be more fun to ask for her own set of baking supplies.  I figure, I would have to supervise her using the Easy Bake Oven anyway, and if we are putting the time and effort in, we might as well make a real dessert so she can learn her way around the kitchen.

So, I headed out to our local Target store and came up with all this:

A Kitchen-y Christmas: Kid Version

Our Target has this cool line of bright-colored, collapsible prep items called squish.  They are reasonably priced, and great for minimal storage since they collapse.  She loves the colors!  I got the 5 quart mixing bowl, the measuring cup set, and the measuring spoon set.  We may expend to some of the other size mixing bowls and the colanders at some point.

The Caterpillar Spatula and Giraffe Wisk are both made by NordicWare.  They also make an alligator rolling pin, but I decided to skip the rolling pin for now.  They are the perfect size for little hands, and love that they are cute with the animal shaped handles.

Then, I got a Wilton 24 cup mini muffin pan and a Kitchen Essentials from Calphalon Bar Pan.  This was to keep with the Easy Bake Oven theme, making things on a smaller scale and individualized.  And, of course, since she was getting a bar pan, I got her a red OXO Good Grips Brownie Sptaula.

A friend of mine is working on an apron for her as well.

She loves all of it!  We made mini blueberry muffins last month, and hopefully, making some brownies today to try out the bar pan and spatula.  In the end, it did cost me a little more for all this than an Easy Bake Oven would have cost, but these items we will be able to use for a lot longer than an Easy Bake Oven, or so I hope!  Hoping to get lots of baking done with these items over the years while she grows up!

A Kitchen-y Christmas!

1 Feb

When my family asked what I wanted for Christmas, of course my reply was kitchen stuff!  Of course, it’s not top of the line, but it will get the job done for what I need (or so I hope!).

Kitchen gadgets from Christmas

First off, a Cuisinart 7 cup Food Processor from my mom and dad.  I have a small, 2 cup food processor, but was really needing something for larger batches of things like guacamole, applesauce, salsa.  I had tried in my blender a few times, and it was ok, but I needed something more.  Plus, I broke my mandolin slicer, and this one came with a slicing blade, so I’m hoping to get some use out of it for slicing and chopping as well.  So far, I used it to make a large batch of guacamole, and it worked great.  Looking forward to using it more!

Next, a Hamilton Beach Electric Griddle from my husband and girls.  My older daughter was the one that picked this out.  It’s something I have thought of getting, but just hadn’t gotten around to getting one.  So, when my husband took her shopping for me, she saw this and the picture on the front of the pancakes and sausage cooking together, and decided it was something I really needed.  She was so excited after they got it, she so wanted to tell me, but instead, told anyone she could what she got me while I was not listening.  And she was so worried the first time I used it that I wouldn’t like it.  I have used it multiple times now, for hamburgers and buns, and pancakes, bacon, and eggs.  I LOVE it!  It cooks everything more evenly than a skillet on the stove, and is large enough to cook a lot all at once.

Also from my husband and girls are the 2 KitchenAid Bamboo Mixer Spatulas, the Oster Hand Mixer with retractable cord, plus dough hook and whisk attachments, and the Oster 10 Speed Blender.  These were to replace older items.

The West Bend Air Crazy Popcorn Popper is from my brother-in-law.  Well, sort of.  He gave me a gift card for Target, so I used it to buy this.  We love popcorn, but I am tired of microwave popcorn.  My family had an air popper when I was a kid, and I loved it, so I was happy they still make them!  This really isn’t anything fancy, and isn’t perfect, but makes us yummy, air popped popcorn!

The KitchenArt Adjust-A-Cup Measuring Cup is from my mom and dad.  This was something my mom had gotten for my sister-in-law’s bridal shower, and thought that my sister and I would like them too.  I think it’s cool!

I also got more measuring cups, Fred M-Cup Measuring Matryoshkas, from my Aunt Connie and Uncle Rick.  These are really cool too! My younger daughter loves playing with the wooden matryoshka dolls at my parents’ house, she even got her own set from my Aunt Paula for Christmas, so it was really neat to get these measuring cups.  Each half of a doll is a different measurement:

Fred M-Cup Measuring Matryoshkas

They also gave me the metal tester on the front right.  It’s cute with a little snowflake on top.

The final item is a Joseph Joseph Rocker Garlic Crusher in my favorite color, purple!  It was from my mom and dad as well.  I learned of this product at the Taste of Home Cooking School show back in November.  I have a garlic press, but wanted to give this a try to see which I like better.  I haven’t had a chance to try yet, but hopefully soon!

Now, hopefully, life will slow down some so I get a chance to cook more and use all these fun, new kitchen tools!

Scholastic Book Fair: Story Laboratory

1 Feb

My last 2 weeks have been consumed with planning and running a Scholastic Book Fair at my children’s school.  I was co-chair with another mom at the school, so we had to come up with a plan for the room, do some decorating, and run the book fair with some help from more parent volunteers at the school.

I love book fairs, I have for a long time.  But, I never realized how much work goes into them!  Scholastic has a great system.  They deliver cases full of books that you open and push up cardboard displays from behind.  Then, they send more books in boxes for you to display on tables, as well as an assortment of pencils, pens, erasers, bookmarks, posters, and other items.  This was the part that took the longest, putting out all the extra items.  It took about 4 hours for the 2 of us to get it all set up, plus the 2 hours I spent in the morning decorating the window and door.

Here are some pictures of it all!

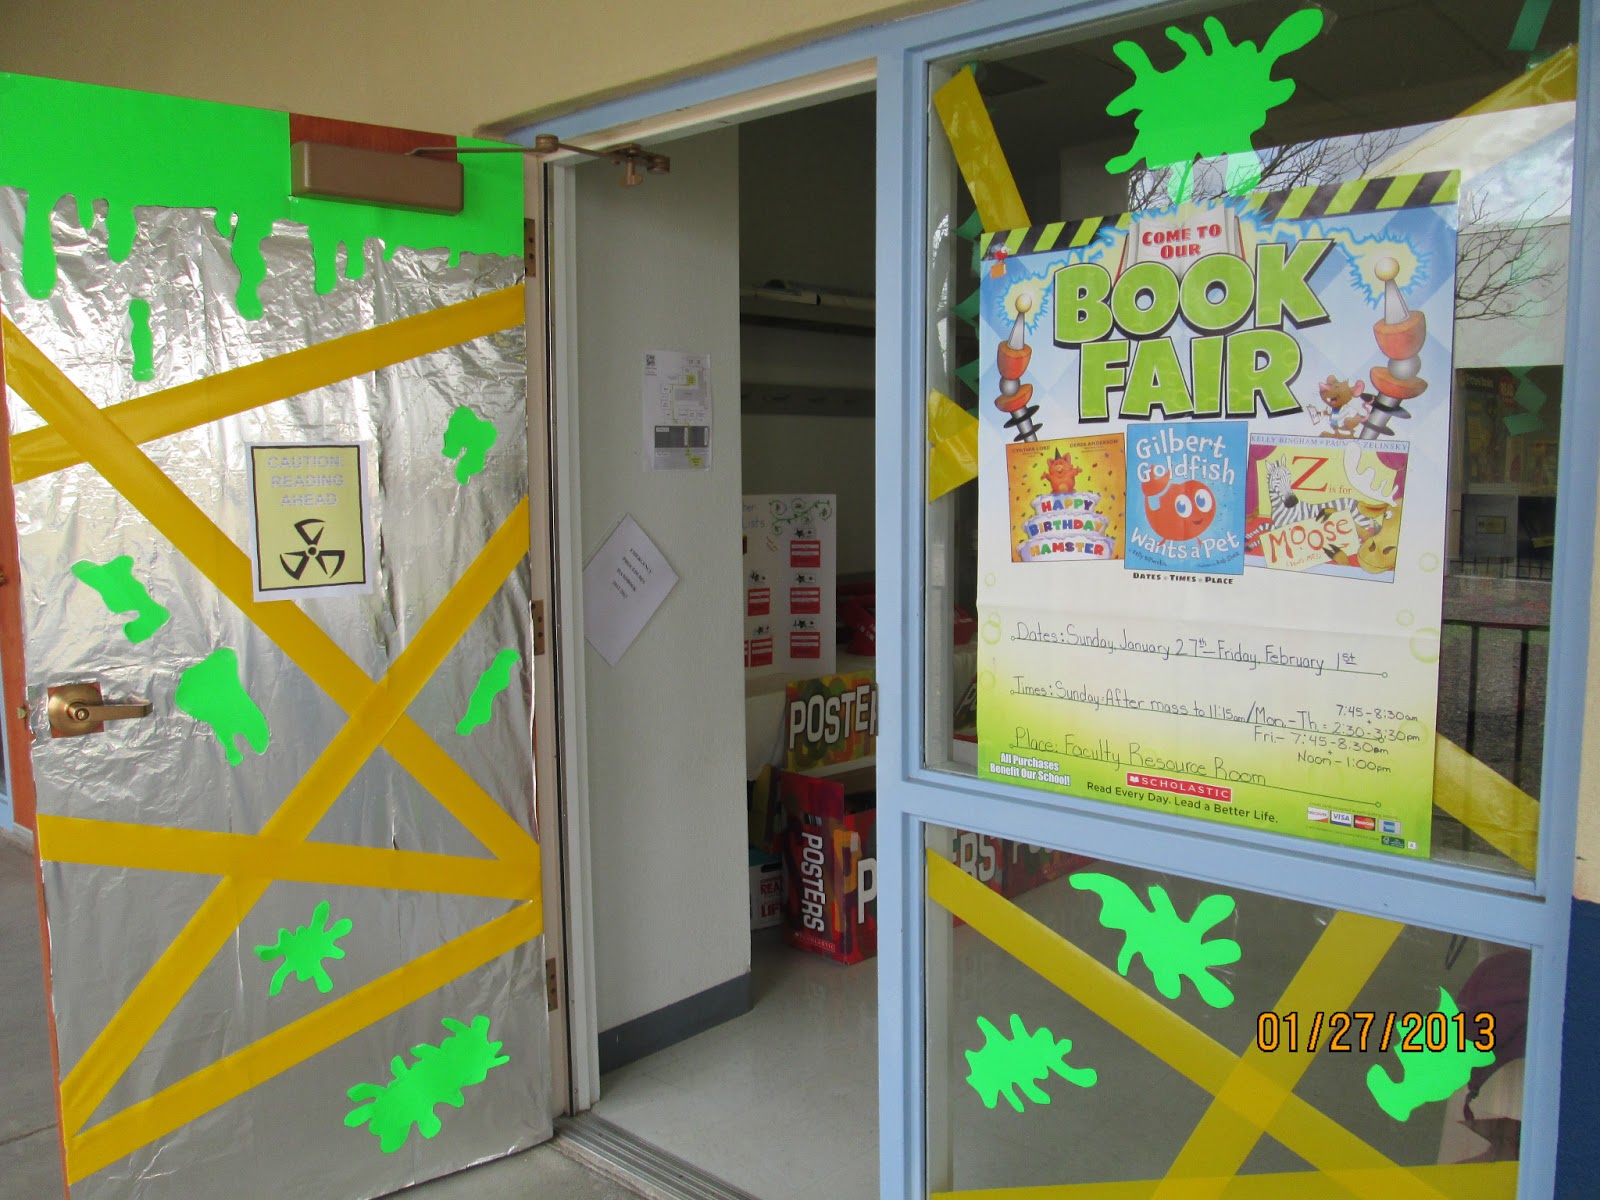
First, the entrance to the book fair.  The spring theme was Story Laboratory, so we wanted to create a science lab feel for the room.  I used aluminum foil to cover the door.  I didn’t quite use a box of 75 sq ft, which cost me $2.88.  Then, I had yellow caution tape from car seat check events that I do, so I put that on both the door and the window.  Next, I got 2 neon green poster boards for $.77 each, $1.54 total, to create the green slime.  The sign on the door I created in PowerPoint (I couldn’t access our chairperson’s toolkit yet to get to the signs Scholastic has to download and print) and says “CAUTION: READING AHEAD”.  Add a roll of packing tape for $2.50 to tape it all up, and decorations cost me $7 total!

Entrance to the book fair

Photo courtesy of Sister Carol, school principal

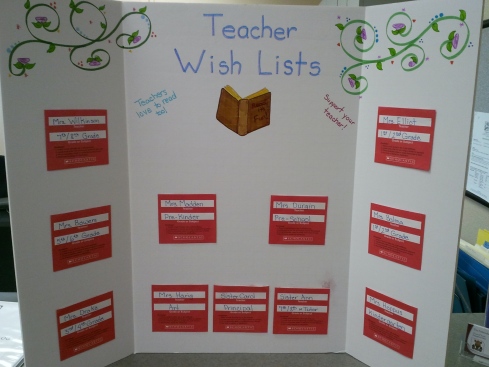
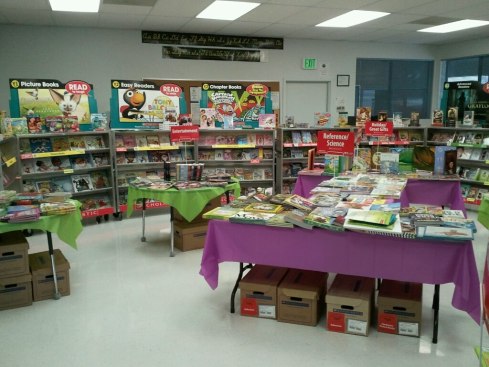
Next, pictures from as you walk in the door and around the room to see all the cases and tables of books and other goodies.  There was a lot!  Oh, and the board with Teacher Wish Lists I have a separate picture of since we didn’t have it out on the table yet, it was on the table with the posters on the floor in front of it.

Teacher Wish List Board

Posters and school supplies Special Value and Preschool books Cases and lots of tables of books 775679_10151206200171437_1946415148_o

Scholastic also sends cash registers for the event, and we could accept cash, check, or credit/debit cards.  Here I am in a lab coat and goggles ringing up a customer on our first day during a school open house.  The lab coats I bought were 3M disposable lab coats in size 2X that were $4.07 each on Amazon, and the goggles were Hot Max safety goggles, which at the time were $2.90 each on Amazon, but it looks like the price has gone up.

Me helping a customer at the register

Photo courtesy of Sister Carol, school principal

The register also tracks all sales, so you can run a report each day of sales and merchandise sold, so you can make sure your drawer is correct and order more items that are selling well.  At the end, you can run a cumulative report to tell you total sales, and also breakdown cash, check, and credit sales.  This makes it really easy to submit the final reports and payment to Scholastic!

So, at the end of the 2 weeks, I’m exhausted from all the work, but the kids’ faces as they came through the book was definitely worth it! I worked the book fair almost all week before and after school, and as I walked in each day, I heard from about every kid I passed, “Are you opening the book fair now?  I have something I want to get!”.  ANYTHING to encourage reading!  Although, being there every day, we did more than our part to monetarily support the book fair!  I think I bought something every day.  I’m already looking forward to next year, and now that I know what to expect, I’m hoping we can make it even better!

Edited on February 3 to add a picture of the Teacher Wish List board.

Zaycon Foods Chicken Tenders

16 Jan

This is the first of two Zaycon Foods chicken events that was available here this month, Breaded Chicken Tenders.  It was $1.99 per pound, and came as 2 boxes of 10 pounds of chicken tenders.  Then, each box actually had 2 bags, so all together I got 4 5 lb bags.  Here are 2 of the bags:

10 pounds of chicken tenders from Zaycon FoodsThese are not formed chicken, but cut pieces of white meat that are breaded.  They are not fully cooked, so they do have to be either deep-fried or baked in the oven (400F for 12-14 minutes, or until fully cooked).  They are made by the Pilgrim’s Pride Corporation under the Sweet Georgia Brand, and nutritional information and cooking instructions can be found here.

I made some for dinner tonight, and they were pretty good.  I cooked them for closer to 15 minutes, but I wanted to make sure they got cooked through.  So far, I’m happy with the purchase!

Cooked Zaycon Foods Chicken Tenders

Spinach and Mozzarella Chicken with Lemon Roasted Potatoes

15 Jan

Spinach and Mozzarella Chicken with Lemon Roasted Potatoes


This turned out amazing!  I had gotten spinach from Bountiful Baskets in the juicing pack I contributed for, and wanted to make it with chicken somehow.  So, I started looking through some recipes, and came up with a marinade for the chicken, then topped with spinach and mozzarella cheese.  I wanted them to be somewhat flatter, but didn’t pound them flat very well.  Just meant that it took a little longer for them to cook.  Since I had gotten red potatoes and lemons as well in my regular basket, I thought roasting the potatoes with lemon would be a nice addition.


Spinach & Mozzarella Chicken

What you need:

1 pound boneless, skinless chicken breasts
1/3 cup olive oil
Juice of 2 lemons (or about 1/3 cup)
1 tablespoon rosemary
2 cloves minced garlic
Salt and pepper
2 cups fresh spinach
1 cup shredded mozzarella cheese

How to make it:

In a small bowl, combine olive oil, lemon juice, rosemary, garlic, salt and pepper.  Put chicken on a flat surface in between 2 pieces of wax paper and pound flat.  Place chicken in a gallon size zipper bag and pour contents of the bowl over chicken in the bag.  Seal bag and place in refrigerator overnight, or for at least 1 hour before cooking.

Remove chicken from bag and discard remaining marinade.  Preheat oven to 400 F.  Heat a large skillet over medium heat.  Cook chicken in skillet for about 5 minutes each side to slightly brown it.  Remove from skillet and place in a baking dish.

In the same skillet, put in the spinach and cook for a few minutes until spinach wilts.  Place spinach on each of the chicken breasts in baking dish.  Next, put shredded mozzarella on top of the spinach on each chicken breast.

Bake in the preheated oven for 20-25 minutes, or until chicken is cooked fully through and cheese is melted.


Lemon Roasted Potatoes

What you need:

3 pounds red potatoes, well scrubbed
Juice of 1 lemon
Olive oil
1/2 teaspoon oregano
1/2 teaspoon garlic salt
1/4 teaspoon ground black pepper

How to make it:

Preheat oven to 400 F.

Dice the potatoes, leaving skins on.  Place in a large bowl.

In a small bowl, mix together remaining ingredients.  Pour over the potatoes in the large bowl.  Toss to fully coat potatoes.

Spray a foil lined baking sheet with non-stick spray.   Spread potatoes in an even layer on the baking sheet.

Cook in the preheated oven for 20 minutes.  Stir potatoes around on baking sheet.  Continue to bake for 15-20 minutes, or until potatoes are browned and softened.