Tag Archives: car seats

PVC Stand for 4’9″ Doll for Child Passenger Safety

20 Feb

I actually made this a few months ago, but am just now getting around to sharing it!

After completing a few PVC pipe projects, I am always looking for other creative ways to use it. We have a 4’9″ demonstration doll for our Child Passenger Safety Technician classes, and I like to take it to check events and informational booths we set up to have a visual idea of what 4’9″ really is. This poor guy has been bungie-strapped to many poles, posts, easy-up sides, and usually slumps down pretty early on in our events.

So, I came up with the idea of making a stand for the doll using PVC pipe. At first, I just had a straight stand, but then decided to add the bar off to the side to make it like the height requirement bars for rides at amusement parks. The bottom of the bar is 4’9″, so kids can walk up to it and see if they are as tall as the bar.

Of course, being 8 years old or 4’9″ isn’t the magic age or height to stop using a booster seat, so I also included the 5 Step Test from Safety Belt Safe USA.

So, here is what the sign says:

Your child must be at least
THIS TALL
to use just the seat belt.
Or, they need to pass the 5-Step Test.
The 5-Step Test
1. 
Does the child sit all the way back against the auto seat?
2. Do the child’s knees bend comfortably at the edge of the auto seat?
3. Does the belt cross the shoulder between the neck and arm?
4. Is the lap belt as low as possible, touching the thighs?
5. Can the child stay seated like this for the whole trip?
If not, use a booster seat to give them a boost!

He still slumps down a little bit, but it holds him up better than a bungie-strap!

All PVC is 3/4″ diameter. Need 14.5 feet of PVC pipe, 3 caps, 5 tees, and 5 elbows to complete.
Base: 2 10″ pieces, 4 3-1/2″ pieces, 2 tee fittings, 4 elbows
Then, 2 43″ pieces into 2 tee fittings
Arm props: 2 6″ pieces with caps on the end
Then, 2 11″ pieces, one goes into elbow, one goes into tee fitting
10″ piece across top, 10″ piece out the side with a cap on the end

Stand for 4'9" Doll

All the dolls at a seat check event

National Child Passenger Safety Week 2012 Wrap Up

22 Sep

In case you missed it, this week I posted information about car seat safety for children. Here are links to all of the information I posted.

National Child Passenger Safety Week 2012

The Right Seat: Rear-Facing

The Right Seat: Forward-Facing

The Right Seat:  Booster Seats

The Right Seat: Seat Belts

Vehicle crashes continue to be leading cause of death for children ages 1 – 12 in the U.S. Please take the time today to make sure the children in your life have an appropriate car seat for their age, height, and weight, have a car seat that is installed properly and have a car seat that is used properly every time they are in the car. If you aren’t sure, please feel free to ask me any questions you may have or find out if there is a Car Seat Inspection location near you to make an appointment with a certified technician.  If you aren’t able to make it to  a technician, here is a checklist that Safe Kids put together for you to use when checking your child’s car seat.  Another great resource is the forums at Car-Seat.org.  There are many knowledgeable people there, as well as reviews and measurements of various car seats.  Also, please feel free to pass this information along to anyone that would benefit from reading it.

Thank you for reading!

The Right Seat: Seat Belts

21 Sep


When your child has outgrown their booster seat, they are ready to use the vehicle seat belt. Instead of going just on age, height, or weight, you should go through the 5 step test to make sure they are ready to be in just the vehicle seat belt. The 5 step test is:

1. Does the child sit all the way back against the vehicle seat?
2. Do the child’s knees bend comfortably at the edge of the vehicle seat?
3. Does the belt cross the shoulder between the neck and arm?
4. Is the lap belt as low as possible, touching the thighs?
5. Can the child stay seated like this for the whole trip?

If you can answer yes to all of these questions, then your child is ready to be in that vehicle’s seat belt. You should perform this test in each vehicle, because your child may be ready in some vehicles, but not all.

Just like with booster seats, your child should always use a lap and shoulder belt, not a lap-only belt. You should also make sure your child keeps the shoulder portion of the seat belt in place and not tucked under their arm or behind their back. Without the shoulder portion, there is no protection for the torso, and the child will move forward much more.

Make sure that everyone in your car has their own seat belt. Children should never share a seat belt.

Children should ride in the back seat of the car until at least 13 years old.

Don’t use any products that say they help make the seat belt fit better. They may not make the seat belt fit better at all, such as putting the lap portion up too high on the abdomen instead of down touching the thighs or creating extra space in the shoulder portion making it loose. If the seat belt doesn’t fit properly, then the child should most likely be in a booster seat.

Be a good example for you children. Wear your seat belt every time you are in the car and wear it properly.

The Right Seat: Booster Seats

20 Sep

After your child has outgrown their forward-facing seat, they should move to a belt positioning booster seat. A belt positioning booster is either part of a combination seat, a high-back booster seat, or a backless booster seat.

Unlike rear-facing and forward-facing seats that use a harness to keep your child in place, a belt positioning booster seat uses the lap and shoulder seat belts in your vehicle. However, lap and shoulder belts are designed for adults, so a belt positioning booster seat raises your child up to make the seat belt fit properly.

Note how I keep referring to lap and shoulder belts. Booster seats must be used with a lap and shoulder belt and never a lap-only belt. If your car only has lap-only belts, use a forward-facing car safety seat with a harness and higher weight limits. Other options are to see if shoulder belts can be installed in your vehicle, use a travel vest that can be used with lap only belts, or buy a different car with lap and shoulder belts.

Besides what type of seat belt your vehicle has, you must also see how your vehicle’s rear seat is set up, are the seat backs high or low, are there headrests. Combination seat boosters and high-back boosters should be used if your vehicle has low seat backs or no headrests. However, check the instruction manual with your seat, some of these booster seats still require that the vehicle seat have high seat backs or headrests. Backless boosters should only be used if your vehicle has high seat backs or head rests.

How do you know the booster seat fits your child properly? The lap portion of the seat belt should be low, across your child’s upper thighs, not on their abdomen. If the seat belt is on their abdomen, serious abdominal injuries could happen in a vehicle crash. Then, the shoulder portion of the seat belt should cross the middle of the child’s chest and shoulder, not digging into their neck or falling off the shoulder.

A belt positioning booster seat should be used until your child can correctly fit in lap and shoulder seat belts. Typically, this is between the ages 8 – 12 or around the height of 4’9″.  If using a combination seat as a booster or a high-back booster, they are outgrown when the child’s shoulder is above the guide for the shoulder portion of the seat belt or when the tips of their ears are taller than the shell or highest head rest position. If a booster is still needed, find a booster with taller belt guides or switch to a no back booster. However, the best way to know that your child is done with a booster and ready for a vehicle seat belt is not to go by age or height, but to perform the 5 step test:

1. Does the child sit all the way back against the vehicle seat?
2. Do the child’s knees bend comfortably at the edge of the vehicle seat and their feet are flat on the vehicle floor?
3. Does the belt cross the shoulder between the neck and arm?
4. Is the lap belt as low as possible, touching the thighs?
5. Can the child stay seated like this for the whole trip?

If you answered no to any of these questions, you need to keep your child in a booster seat, regardless of what the laws in your state are.  Most states have now passed into law “booster laws” that state children need to remain in a child car seat or booster seat until age 8 or a height of 4’9″.  If your state doesn’t have this law or even if they do have this law, it is highly recommended that you follow best practice and keep them in a booster seat until they pass the 5 step test.

You may ask, but won’t my child be made fun of by his/her friends if still in a “baby seat”? Well, first off, the minimum age and weight for most boosters is 40 pounds, which most kids don’t reach until between ages 3 and 4. Boosters are definitely not “baby seats”, they are for big kids. Second, by not using a booster, the injuries sustained in a vehicle crash would be a lot worse than some teasing by friends.  Plus, it is now the law in many states to continue using a booster until age 8 or 4’9″.

Don’t be in a rush to stop using a booster seat.  This report talks about the importance of using a booster and the injuries that may be received if a booster is not used.

One last note, when a booster is not occupied, still buckle it in using the seat belt. This will keep the booster from moving around in the back seat or from becoming a projectile in a crash. Some booster seats are now available with LATCH clips to keep the booster in place when not occupied so you don’t have to remember to buckle it in each time.

The Right Seat: Forward-Facing

19 Sep

After your child has outgrown their rear-facing seat, they should move to a forward-facing seat with a 5 point harness. There are 5 types of car seats that can be used forward-facing (taken from Car Safety Seats: Information for Families 2012)

  • Convertible seats—Seats that “convert” from rear-facing to forward-facing seats. These include 3-in-1 seats.
  • Forward-facing only—Seats can be used forward-facing with a harness for children who weigh up to 40 to 80 pounds (depending on the model). Although manufacturers are not currently making any forward-facing only seats, many remain in use from previous years.
  • Combination seat with harness—Seats can be used forward-facing with a harness for children who weigh up to 40 to 90 pounds (depending on the model) or without the harness as a booster (up to 80–120 pounds, depending on the model).
  • Built-in seats—Some vehicles come with built-in forward-facing seats. Weight and height limits vary. Read your vehicle owner’s manual or contact the manufacturer for details about how to use these seats.
  • Travel vests—Vests can be worn by children between 20 and 168 pounds and can be an option to traditional forward-facing seats. They are useful for when a vehicle has lap-only seat belts in the rear or for children whose weight has exceeded that allowed by car seats. These vests may require use of a top tether.

The child should remain in a forward-facing seat until they reach the limits of their car seat. These limits are either the maximum forward-facing weight or height limit, or when their shoulders are even with the top harness position, or when the tips of their ears are even with the top of the seat shell, whichever comes first. In most cases, the weight limit will be 40, 65, or 85 pounds.

Another important factor is age. A child should be at least 4 years old before moving out of a 5 point harness and into a booster, if not 5 or 6 years old, depending on their maturity level. Once a child can remain properly positioned in a belt positioning booster for the entire ride, then it is time to make the switch. If needed, higher height and weight limit seats should be used until the child is mature enough for a belt positioning booster.

When installing a forward-facing seat, here are some things to consider:

  • Make sure the harness is positioned at or above your child’s shoulders.
  • If you are using a convertible seat for forward-facing, make sure the vehicle belt or LATCH strap is routed through the correct belt path of the seat.  If installing with a seat belt, make sure that the LATCH strap is secured to the car seat so they are not loose to cause injury.  If you are installing with the lower anchors, you may consider buckling the seat belt and locking it before installing the seat so your child will not play with the loose seat belt.
  • Always attach the top tether strap on the car seat to an appropriate anchor point in your vehicle. To find these anchor points, read through your vehicle’s owner’s manual. Tethers give important extra protection by keeping the car seat and the child’s head from moving too far forward in a crash or sudden stop, reducing the child’s forward movement by up to 6 inches (see picture below).  If you do not use the tether, make sure it is secured somewhere

The Right Seat: Rear-Facing Car Seats

18 Sep

There are 2 types of car seats that are for rear-facing, infant carriers and convertible seats. Infant carriers typically have weight limits of 22, 30, and now 35 pounds. Convertible seats have rear facing weight limits of 30, 33, 35, and now 40 and 45 pounds.

Children should start rear-facing the day they come home from the hospital. The minimum by law in all states to stop rear-facing is 1 year AND 20 pounds. The child must meet both of these requirements, not one. However, a lot of child car seats available today have forward-facing minimums of 1 year and 22 pounds. At least one manufacturer, Dorel (they include the brands Cosco, Safety 1st, and Eddie Bauer) also has a minimum height requirement. This is why it is important to read and be familiar with the instruction manual for your child’s car seat.

However, best practice suggests otherwise. Safe Kids USANHTSA, and the American Academy of Pediatrics now recommend that all infants and toddlers should ride in a rear-facing child car seat until they are at least 2 years of age or until they reach the highest weight or height allowed by the manufacturer of their child car seat.  At age 2, if a child is still within the weight and height limits of their child car seat, they should remain rear facing until they reach those limits.

A common misconception is that a child is ready to travel facing forward when his neck muscles are strong enough to support and control his head. However, crash dynamics show otherwise. Because the torso is restrained, the head is free to move around. The rigidity of the bones in the neck and strength of the connecting ligaments (not the muscles) hold the adult spine together and keep the spinal cord intact within the confines of the vertebral column. Very young children, however, have immature vertebrae that are still partly made of cartilage. These are soft and will deform and/or separate under tension, leaving just the spinal cord as the last link between the head and the torso. According to documented research, autopsy specimens of infant spines and ligaments allow for spinal column elongation of up to two inches, but the spinal cord ruptures if stretched more than 1/4 inch. Real-world experience has shown that a young child’s skull can be literally ripped from her spine by the force of a crash. (Refer to here for more info) There are also some benefits to being rear-facing in a side impact crash.

Another common misconception is that a child should switch to forward-facing when their feet touch the vehicle seatback or the legs must be bent. There are no documented cases where a child’s legs have been injured because they were rear-facing. And even if there were cases, a broken leg is much easier to fix than a broken neck.

You may think no one rear-faces that long, but from personal experience, my oldest was rear-facing until the age of 2 and my second child rear-faced until age 2 1/2. You can see more pictures of kids rear-facing past the age of 1 in this album.

This video is from Europe, where car seats can accommodate children rear facing to 4 years old and 55 pounds, but it does a nice job of explaining how rear-facing seats spread the crash forces more evenly over the child’s head, neck, and spine in a crash:

Here are some important things to remember when using a rear-facing car seat.

  • Never place a rear-facing car safety seat in the front seat of a vehicle that has an active front passenger air bag. If the air bag inflates, it will hit the back of the car safety seat, right where your baby’s head is, and could cause serious injury or death.
  • Make sure the harness is positioned at or below your child’s shoulders.
  • Since children grow in different proportions, it is important to know the height limit of the car seat, but it is also important to make sure that there is always at least 1″ of car seat shell above the child’s head.  This article shows how to check for the 1″.
  • If you are using a convertible seat for rear-facing, make sure the vehicle belt or LATCH strap is routed through the correct belt path of the seat.  If installing with a seat belt, make sure that the LATCH strap and top tether are secured to the car seat so they are not loose to cause injury.  If you are installing with the lower anchors, you may consider buckling the seat belt and locking it before installing the seat so your child will not play with the loose seat belt.
  • Make sure the seat is at the correct angle so your infant’s head does not flop forward. Many seats have angle indicators or adjusters that can help prevent this. If your seat does not have an angle adjuster, tilt the car safety seat back by putting a rolled towel or other firm padding (such as a pool noodle) under the base near the point where the back and bottom of the vehicle seat meet. For small infants, the angle of recline should be 45 degrees. For older children, the seat can be more upright, to an angle of recline of 30 degrees.
  • If you child slouches in the seat, you may add things around the child, not behind the child, using things such as rolled up cloth diapers or receiving blankets. Do not use any sort of car safety seat insert unless it came with the seat or was made by the manufacturer of the seat.
  • Do not place an infant seat on the top of a shopping cart. It may seem like it clicks into place, but this is not how that locking mechanism on the seat is designed to be used. Plus, it changes the center of gravity of the shopping cart, which could make it easier to tip with just a bump. If you really want to keep the baby in the infant car seat, put the car seat in a travel system stroller and either pull a shopping cart while pushing the stroller or use the stroller basket to hold the items. Another option is to put the infant carrier in the main basket of the shopping cart and pile groceries around the carrier. Yet another option is to take your baby out of their car seat and put them in a sling or other baby carrier.

National Passenger Safety Week 2012

17 Sep

Last year for National Child Passenger Safety Week, I featured a series of posts on the various stages of car seats.  I will be doing similar posts this year; a lot of the content is the same as it’s always good for a refresher, but some content is updated to reflect changes over the last year.  National Child Passenger Safety Week is September 16 – 22, 2012, and you can learn more about it NHTSA’s website here.

After the birth of my first daughter, I really started researching child car seats and safety in the car. I found there was a ton of information out there, most I had never heard of before. It motivated me to research what I could and share the information with other parents. I took the week-long class and became a certified Child Passenger Safety Technician (CPST) in October 2008.  In April of 2010, I became a Child Passenger Safety Technician Instructor (CPST-I).

Last year, Safe Kids USA released a new study.  They analyzed data from 79,000 child car seat checklist forms that were completed by Safe Kids coalitions at child safety seat checks around the country for the years 2009-2010. Previously, the National Highway Traffic Safety Administration has done research that shows three out of four child safety seats are improperly installed.  The new Safe Kids research says that this percentage has improved slightly, but there is still room for more improvement considering car crashes remain as the leading cause of death in children ages 1 – 12.

Today, I would like to share some general car seat information and over the next few days, I will share specific information for each of NHTSA’s Four Steps for Kids, rear-facing, forward-facing, booster, and seat belt.  At the end of the week, Saturday, September 22, it is National Seat Check Saturday.  Safe Kids coalitions and child passenger safety technicians around the country will be holding events for parents to bring their vehicles to get child car seats checked.  To find out if there is a location near you that is participating this Saturday, check here or your with your local Safe Kids coalition.

Here are some questions you need to ask yourself about your child(ren)’s child car seats.

Are you using a child car seat every time you are in the car, even if it is a 2 minute trip down the street?  Everyone in the car should be buckled up, every time the car is moving, even in a parking lot.  Here is a video from the University of Michigan Transportation Research Institute showing the difference between a properly restrained child and a child not restrained at all at 30 mph.  The restrained child would most likely walk away with minimal injuries, while the unrestrained child would suffer life threatening injuries.

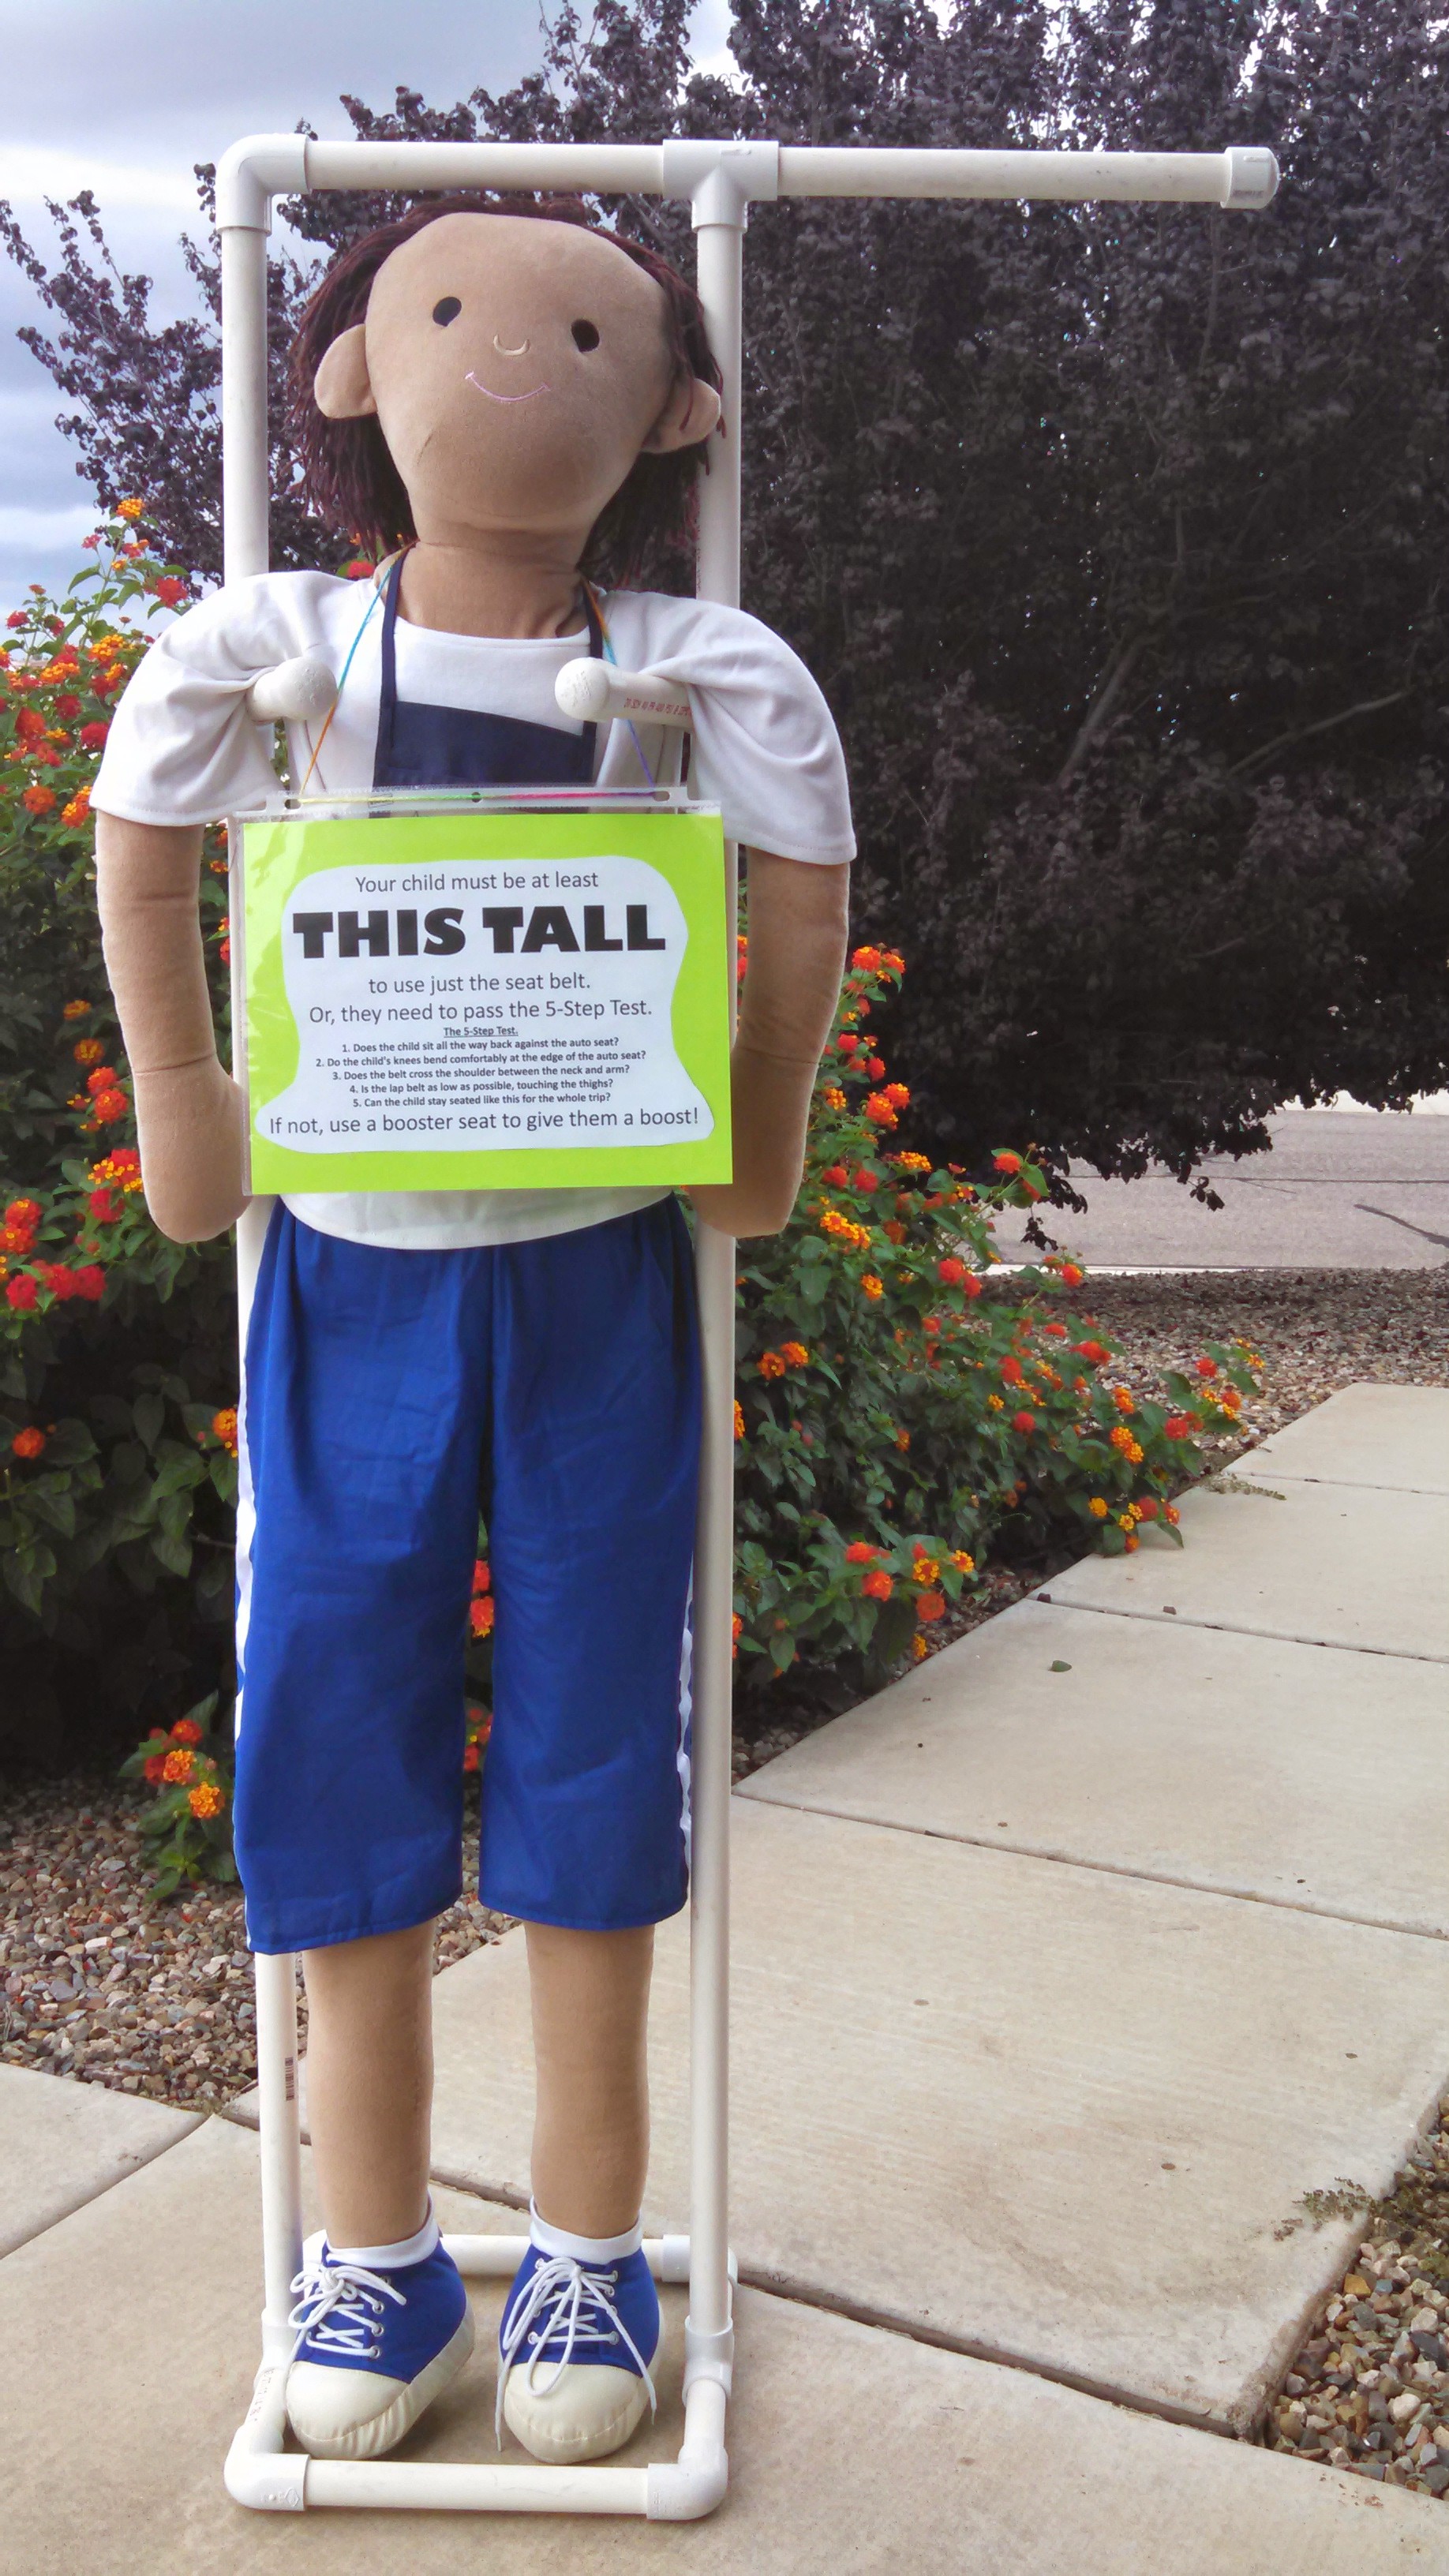
Are you using the proper car seat based on your child’s age, height, and weight?  Using a proper child car seat greatly reduces the risk of injury or death in a vehicle crash.  In general, children should ride in a rear facing seat until at least the age of 2, then ride in a forward facing harnessed seat until they outgrow the seat by height and weight, then move to a booster seat until they can pass the 5 step test.  Don’t be in a rush to move your child to the next type of seat or to just the seat belt alone.

Is the seat installed correctly?  Before you install any child car seat, you need to read the manual that came with that seat and also your vehicle owner’s manual.  Both provide vital information on how the child car seat is to be used in the vehicle and where to place it.  When a child car seat is properly installed, it should not move more than one inch front to back or side to side when checked at the belt path only.  You should use either the vehicle’s seat belt or LATCH system to secure the child car seat, not both, unless approved by BOTH the vehicle and child car seat manufacturer. If you use the seat belt, make sure you know how it locks to keep the child car seat in place.

Are you using the harness or seat belt correctly?  On a harnessed seat, the harness should be at or below the shoulders for rear facing, then at or above the shoulders for forward facing.  You also need to make sure the harness is tight enough using the pinch test.  You should not be able to pinch any of the harness strap at their shoulders, your fingers should slide off.  In a booster seat, you need to make sure the lap portion of the seat belt goes over the pelvic bone or upper thighs, not up on their abdomen.  Then, the shoulder portion should not be falling off the shoulder or digging into the neck.

Is your child riding in the back seat?  All children under 13 should ride in the back seat.

Do you have any loose items in the car?  Any loose items in a vehicle, such as toys, purses, laptop bags or umbrellas can become dangerous projectiles in a crash or sudden stop and cause severe injury to a child, other passengers or the driver. Make sure to secure loose items and provide children with only soft toys to play with in a vehicle.

Is your child’s car seat expired? Most car seats expire 6 years from date of manufacture. Few others expire 7 or 8 years from date of manufacture. Check your owner’s manual or stampings on the car seat to see when your child’s car seat expires.

Is the integrity of your car seat questionable? First, where did you purchase your child’s car seat? If you purchased it second-hand or found it discarded, you should purchase a new seat. Why? There is no way to know if it is expired, has been recalled, was ever misused (i.e. harness straps put in the washer) or involved in an accident. Second, if you were involved in an accident, the car seat most likely needs to be replaced. Check your owner’s manual or with the car seat manufacturer to see what their replacement requirements are. At-fault insurance should pay for replacement. For more on this topic, see this article.

Is your child over-bundled? Fluffy coats or baby buntings can compress greatly in an accident, making the harness too loose on the child, putting them at risk for ejection from the seat. Put a blanket on them, put the coat on backwards after they are buckled in, use a cover on infant seats that goes over the whole seat (looks like a shower cap, not a bunting bag that goes in the seat), or a product like the Car Seat Poncho.

Are you using after market products? Almost all car seat manuals include a warning statement about not using products that didn’t come with the seat, things like head supports, harness strap covers, bunting bags, etc. These items may cause extra space around your child or compress differently in an accident then how the seat was initially tested. Yes, the package says it is crash tested, but it may not have been tested with your specific seat, so you don’t really know how it will interact with your seat in accident.

Do you know the child restraint laws in your state?  Most notably, there were some changes to the law in Arizona.  The previous stated that children need to be in a child restraint until the age of 5.  The new law, which took effect on August 2, now adds that children between the age of 5 and 7, that are under a height of 4’10″, will need to be in a child restraint.  Please note, in most cases, the law is the bare minimum requirement, best practice suggestions are different, and I will discuss those more throughout the week.

New Booster Law for Arizona

24 Jul

On August 2, Arizona will become the 48th state to have what is referred to as a booster law.  Why call it a booster law?  Because this law will now include children in the age group where a booster seat is most likely the appropriate child restraint for them to use.  Currently, the law in Arizona states that children need to be in a child restraint until the age of 5.  The new law, taking effect on August 2, now adds that children between the age of 5 and 7, that are under a height of 4’10”, will need to be in a child restraint.

However, you know that saying that age is just a number?  Well, when it comes to boosters, age, height, and weight are just numbers.  The best way to know if your child should still use a booster seat is the 5 Step Test from SafetyBeltSafe USA:

The 5-Step Test

1. Does the child sit all the way back against the auto seat?
2. Do the child’s knees bend comfortably at the edge of the auto seat?
3. Does the belt cross the shoulder between the neck and arm?
4. Is the lap belt as low as possible, touching the thighs?
5. Can the child stay seated like this for the whole trip?

If you answered no to any of those questions, your child still needs a booster seat.  Boosters help make sure the seat belt goes across the strongest parts of your child’s body for better protection in a crash.  They are relatively inexpensive, most backless boosters are $20 or less.


Do you live in another state or will be travelling through another state, and are unsure of the child restraint laws there?  Click here to see a summary of the laws in each state.

Bountiful Baskets and Car Seat Check- 4/21/2012

22 Apr

I had wanted to get this done yesterday, but I was exhausted after the morning.  Both things that I am currently volunteering at, Bountiful Baskets and car seat checks with San Pedro Kiwanis, were both scheduled at the same time yesterday.  Lucky for me, they were both in the same area!  So, I was able to go back and forth to both yesterday.

First, my car was loaded up with new car seats to have on hand in case we had to replace any during the seat check.  They just fit into the back of my Chevy Equinox!

I stopped and unloaded them, and set up other things for the seat check, then headed over to the Bountiful Baskets site to drop off the sign I made and help them get started on set up.  I like that it’s open and has great scenery with the mountains in full view.

I then was at the seat check for most of the distribution time, and we ended up checking 10 car seats overall.  I was happy with the amount, and we had plenty of technicians on hand to help.  When it was time, I went over and got my basket.  This week, I only got the conventional basket since I didn’t want to worry about getting extras since I wasn’t going to be on site most of the time.  Lots of good things this week!

Spinach, corn, celery, yellow squash, Romaine lettuce, yellow onion, Roma tomatoes, Ambrosia apples, bananas, lemons, strawberries (some are missing because my daughters got to them before I could!), and kiwi.

Here are a few ideas for this week:

Spinach: Spinach Basil Pesto Pizza, Spinach Lasagna Roll ups, Cheesy Spinach Burgers, Sausage Florentine Pizza, Spinach Bacon Shells & Cheese, Spinach Mushroom Quiche, Slow Cooker Spinach, Lentil, & Tortellini Soup, Hot Spinach Artichoke Dip, Spinach Manicotti, Spanakopita  (Can you tell I’m a BIG fan on spinach?!)

Corn: Corn & Broccoli Casserole, Roasted Corn Salsa

And, here is the link to last week’s basket post since some of the items are the same!


Note: The type and amount of food may vary from another basket because of geographic location and because of variances in how the ends of produce cases are distributed after everything has been distributed evenly.  I also volunteered this week and got 1 extra item for volunteering.


This post is participating in a Bountiful Baskets Menu Plan Link-Up with Healthy Mom’s Kitchen to share recipes and menu plans using Bountiful Baskets items.

W.H.A.L.E. Program

13 Oct

Since I do not have a job that being a Child Passenger Safety Technician Instructor is a part of, it sometimes is difficult to find opportunities to do community events.  Back in July, I was contacted by the San Pedro Kiwanis to help them at a Back to School Fair in our city.  The Kiwanis Club does a number of community outreach programs for kids, and one of those is the WHALE program.  WHALE stands for We Have a Little Emergency, and is used to help emergency personnel care for a child in a crash if the parents can’t speak for the child.  The first sticker is a bright-colored sticker, and you put the child’s name, any allergies or medical conditions, and emergency contact names and phone numbers.  Then, there are 2 stickers that say WHALE that go on each side of the car seat to let emergency personnel know to look for the information sticker.  The last 2 stickers say WHALE as well and go in the rear vehicle windows, again to let emergency personnel know to look for the information sticker.  At the Back to School Fair, they wanted CPSTs available to do car seat checks along with putting these stickers on car seats.  At that event, there was another CPST and myself, and we checked and put WHALE stickers on 13 car seats.  Then, the Kiwanis Club contacted me again about doing a car seat check event to distribute more WHALE stickers.  This time we had 4 CPSTs and one of the CPSTs had recently obtained a number of car seats, so we had car seats available to give to people who came with no seat, an expired seat, or an outgrown seat.  We got 20 seats checked and stickers on that day, 10 of which were new seats we gave out that day.  It was a really great event, and the Kiwanis Club members are a great group of people to work with.  Hopefully we’ll be able to have another event in the spring to continue to get the WHALE stickers out there and to make sure seats are properly installed to keep kids safe in the car.

Here is a picture of some of the seats we had that day.

And here is a scan of a picture and blurb in the local paper of myself showing one of the moms that came in for a car seat check how to check for proper harness tightness at the shoulder.