Tag Archives: egg

Cheesy Sausage, Onion, and Pepper Breakfast Casserole

29 Jun

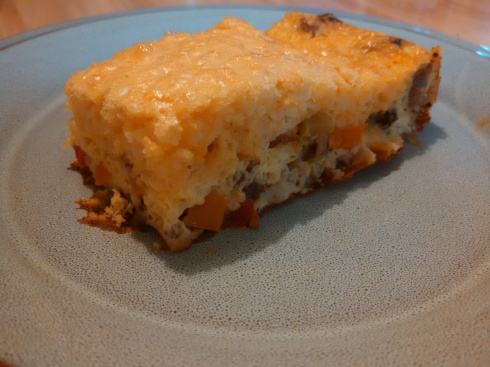
It has been a while since I’ve made a breakfast casserole. I’ve had the breakfast sausage for a while in the freezer, and while at the grocery store, my girls picked out red, orange, yellow, and green bell peppers. Along with an onion, milk, eggs, and Bisquick, I knew it would make a delicious breakfast casserole! Plus, it was really pretty too, very colorful!

Prepping the breakfast casserole

One great thing about a casserole like this, you can make it up ahead of time and keep it in the refrigerator for up to 12 hours before baking it. So, you can make this the night before, wake up, take it out of the refrigerator, preheat your oven, and then bake it.

Also, if you are hesitant about bell peppers, substitute in other vegetables that you like! I would do this again with broccoli or spinach and mushrooms, maybe even spinach, mushrooms, and tomatoes. Or, change out the sausage for bacon or ham. Whatever you would eat in an omelet or you like with your eggs, try in this casserole!

Cheesy Sausage, Onion, and Pepper Breakfast Casserole

Cheesy Sausage, Onion, and Pepper Breakfast Casserole

What you need:

1 pound breakfast sausage (if there are casings, remove them)
1 small red onion, diced
2 bell peppers, diced (I used 1/2 red, 1/2 orange, 1/2 yellow, and 1/2 green)
2 cups Mexican blend shredded cheese
1 1/4 cups baking mix, such as Bisquick
1 cup milk
9 eggs
1/2 teaspoon paprika
1/2 teaspoon salt
1/4 teaspoon ground black pepper

How to make it:

Preheat oven to 350 F. Spray a 9 x 13 casserole dish with olive oil or non-stick cooking spray.

In a large skillet, break up and brown the breakfast sausage. Add in diced onion and bell pepper. Cook until onions and peppers have softened. Drain the excess grease from the pan, and pour the sausage, onions, and peppers into the casserole dish. Spread the 2 cups of shredded cheese on top.

Meanwhile, in a medium bowl, whisk together the baking mix, milk, eggs, paprika, salt and pepper. Pour evenly into the casserole dish.

Bake in the preheated oven for 30-35 minutes, or until golden brown on top and a knife comes out clean from the center.

Crustless Quiche in the George Foreman Evolve Grill

3 Apr

I love that my mom always gets me kitchen items for gifts. Past gifts have included a food processor, a handheld blender, a toaster oven, all of which I love and use regularly. This Christmas, she got me the George Foreman Evolve Grill that I had been eyeing for a while. The George Foreman grill we had I liked, but it was showing its age. I think we had it almost 10 years. It was time for a new one.

I like this version. It has interchangeable plates to make a variety of things, and I like the removable plates for easier clean up. Mine came with the grill plates, the bake dish, and the slider plate. I have already made burgers a couple of times with the grill plates, but was ready to try out the bake dish.

This was super easy to make, and it was really nice on this hot day to not have to use my oven. This still puts off some heat, but not like using the oven. What is also nice is that it’s flexible as to what veggies you want to use. I used spinach, mushrooms, and green onions, but you could use broccoli, carrots, red onions, yellow onions, whatever combination you like. You could also add cooked bacon or ham to this as well.

I pulled out my electric griddle and made pancakes to go with this while it baked.

Crustless Quiche in the George Foreman Evolve Grill

Crustless Quiche in the George Foreman Evolve Grill

What you need:

1 Tablespoon olive oil
1/2 cup spinach, chopped
1/2 cup mushrooms, diced
1/2 bunch green onions, diced
5 eggs
1/2 cup milk
1/2 cup shredded cheddar cheese, plus some extra for the top
Salt and pepper

How to make it:

Place the grill plate on top and bake dish on bottom of the Evolve Grill. Set heat to 375, and set timer for 5 minutes to preheat. Make sure the grill is in the upright flat position and not tilted forward.

While grill is heating, whisk together the eggs, milk, shredded cheese, salt, and pepper.

Once grill is ready, heat the oil and add spinach, mushrooms, and green onions. Stir for 5 minutes to soften.

Pour in the egg mixture and gently stir to combine all ingredients. Sprinkle shredded cheddar over the egg mixture.

Close the cover and cook for 15 minutes. Let stand for 5 minutes before cutting and serving.

Crustless Quiche in the George Foreman Evolve Grill

Summer Squash, Sausage, and Egg Bake

26 Jun

This time of year, summer squash, like zucchini and yellow squash, seem to be in abundance.  One of my all time favorite dishes to make is Italian Zucchini Crescent Pie, either with just zucchini or a mix of zucchini and yellow squash.  However, my husband isn’t real fond of the crust.  So, I had experimented with a mashed potato crust, but still got mixed reviews from the family.  So, I decided to make it crust-less, using this recipe for inspiration.  I decided to use different cheese and not any additional seasoning since I added sausage.  We loved it!  Plus, I’m already working on other variations, no sausage, possibly ground beef, use oregano and basil to season, try out different cheeses.  It’s very versatile to be able to use what you have on hand!  I will hopefully update on my future combinations, but for now, here is the one I made last night.

Summer Squash, Sausage and Egg Bake


Summer Squash, Sausage, and Egg Bake

What you need:

1 pound sausage (I used Johnsonville Mild Italian Sausage)
1 small onion
1 medium size yellow squash, cut into thin slices
1 medium size zucchini, cut into thin slices
4 oz cream cheese, softened
3 large eggs, well beaten
1 cup shredded mozzarella cheese
1/4 cup grated Parmesan cheese

How to make it:

Preheat oven to 400 F.

In a large skillet, brown sausage.  Do not drain fat.  Add onions, yellow squash, and zucchini, and cook until soft and translucent.  Stir in cream cheese until well blended.

Meanwhile, in a small bowl, mix together eggs, mozzarella cheese, and Parmesan cheese.

Spray a 2 quart casserole dish with non-stick cooking spray.  Pour the squash/sausage mixture into the dish.  Mix in the egg and cheese mixture.

Bake in the preheated oven for 25-30 minutes, or until sides are bubbling and a knife inserted in the center comes out clean.

Breakfast Biscuit Bowls

9 Jun

As promised, here is the update on my next round of biscuit bowls!

Once again, I used 1 can of Grands biscuits.  This time, I sprayed the small Pyrex bowls on the outside, rolled together 2 Grands biscuits, and spread it over the outside of the bowl.  I lined a baking sheet with aluminum foil, placed the upside down bowls on the sheet, and baked in the oven at 350 F.  After 12 minutes, I started checking them, and mine were finished in 20 minutes.  Time may vary by oven and by what you bake them on.

Biscuit bowls after bakingThen, I worked on the filling.  You can see a peek of the skillet in the picture above.  I started by removing the casings from breakfast sausage and crumbling and cooking in a  large skillet over medium heat.  Once browned, I left the fat in and mixed in small cubes of red potatoes.  I let this cook for a while to let the potatoes soften.  Next, I added in some diced red onion, and cooked until the onions were translucent.  Then, I added in diced mushrooms and chopped fresh spinach.  Once the spinach wilted, I pushed it all up to one side, and on the empty side, added in 6 eggs that I had whisked with a couple of tablespoons of milk.  Once this cooked up and I stirred to scramble, I mixed the eggs in with the rest, giving me this delicious-ness:

Sausage, red potato, red onion, mushroom, spinach, and scrambled egg filling for biscuit bowls


Then, assembly time!  My older daughter added grated Parmesan to hers, I added crumbled feta to mine, and my younger daughter and my husband added shredded cheddar to theirs.  I had some filling leftover, so I made a few burritos using large flour tortillas that I had on hand.

Breakfast Biscuit Bowl with Parmesan cheese Breakfast Biscuit Bowl with crumbled feta


I was very pleased with how it all turned out, and we will be having this again, and soon!


Cinnamon French Toast

3 Feb

Cinnamon French Toast


I love French toast, but it’s not something I make all too often.  My husband had bought a loaf of artisan French bread for $0.99 at Safeway, one of our Just for U personalized deals on our Club Card.  Usually, we just have the bread with butter with our dinner, but since I have the new electric griddle, I decided to try it out making French toast today.  It was perfect to get all the slices on at once and to cook them all evenly:

Electric griddle with French toast cooking

It’s been a while since I’ve made French toast, so I looked up a few recipes and came up with this combination.  I put a little powdered sugar on top, and served it with cut strawberries and bananas.  My older daughter thought it was beautiful!  And delicious.


Cinnamon French Toast

What you need:

8 slices of bread, preferably French bread cut 1/2″ – 1″ thick
1 cup milk or half and half
3 large eggs
2 tablespoons honey, warmed in microwave about 20 seconds
1 teaspoon cinnamon
1/4 teaspoon vanilla extract

How to make it:

In a bowl, whisk together, milk, eggs, honey, cinnamon, and vanilla extract.  Pour mixture into a pie pan.

Dip each slice of bread in the mixture, allowing both sides of bread to soak for a few seconds.  Place each slice in a skillet or on an electric griddle and cook until golden brown on each side, about 2-3 minutes for each side.  Serve with powdered sugar, syrup, and fresh fruit, if desired.

Spinach, Feta, and Bacon Mini Quiche

20 Nov


I got a chance to try out a recipe from the 2012 Taste of Home Cooking School show that I recently attended.  These are delicious!  The original recipe calls for brie, but since I had feta cheese on hand, I used it instead, knowing it is a good combination with spinach and bacon.  It also says to use 2 pie crusts, but I found that 1 pie crust and the filling filled the 12 muffin cups in my pan.  So, since I had both pie crusts ready to go, I doubled the amount of filling and got 24 mini quiches.  Yum!


Spinach, Feta, and Bacon Mini Quiche
Original recipe here

What you need:

4 eggs
1/2 cup milk
1/2 cup crumbled feta cheese
1/4 cup red onion, finely diced
1 cup fresh spinach leaves, washed & diced
2 slices bacon, cooked & crumbled
1/4 teaspoon salt
1/4 teaspoon pepper
1 refrigerated pie crust

How to make it:

Preheat oven to 350 F.  Spray a 12-cup muffin tin with non-stick cooking spray.

In a medium-size bowl, whisk eggs together with milk, salt & pepper.  Add spinach, bacon, onion, and feta to egg mixture and blend well.

Roll out pie crust and cut in 3 inch circles (I used a juice glass to cut the circles); line muffin tins with circles.

Spoon egg mixture into each muffin cup, filling 3/4 full; place in oven and cook for 25 minutes or until eggs are set.

Greek Easter Traditions and A Natural Way to Color Easter Eggs

7 Apr

My good friend and former next door neighbor, Inga, is the one who introduced me to this method of coloring eggs for Easter.  She grew up in Latvia and her family would use onion skins to get the coloring for the eggs, and use gauze or cheesecloth to wrap leaves, flowers, or other items to make patterns on the eggs.  I never got a chance to do it with her, but thought it would be neat to try sometime.

As it turns out, using onion skins for coloring is one of the ways to get eggs red colored for Greek Easter.  When I was growing up, we attended a Catholic church and with my mom’s family being Greek Orthodox, we would celebrate both Western Easter and Greek Orthodox Easter.  Some years, the 2 Easters would fall on the same date, other years they are on different dates.  Why different dates?  Both use the same rules, it must be after the Vernal (Spring) Equinox, after Jewish Passover, with the first full moon on a Sunday after the 21st of March.  However, the Orthodox church uses the Julian calendar to find the date, and Western churches use the Gregorian calendar to find the date.  This year, they are a week apart, Western Easter is Sunday, April 7, and Orthodox Easter is Sunday, April 15.  I didn’t know all the reasons back then, I just thought it was cool to get to have 2 Easter celebrations each year.  And even now, I just have bits and pieces of traditions.  So, here is what I remember us doing.  For Greek Easter each year, we would go to my grandparents house for dinner.  I don’t know that I remember eating lamb, but I’m sure we did a few times.  I do remember sitting down to dinner and my grandparents, my mom, and my aunts and uncle, would all sing a Greek Easter hymn, “Xristos Anesti”, which means Christ is Risen.  Here is how it is sung: Xristos Anesti Hymn.

Then, we would pass around the colored, hard-boiled eggs, and play the egg game.  Your goal is to keep your egg from getting cracked, while cracking everyone else’s egg.  You want to make sure you get a good grip on it, then you take turns lightly tapping each others eggs.  Once your egg is cracked on both ends, you are out.  If you manage to keep your egg intact, then you are the winner!

So, back to the eggs.  Yes, there are artificial colors and dyes to make all kinds of pretty colored eggs, but there are natural ways to color them too.  There are a variety of foods and spices that can be used to get various colors, here are a few:

Yellow or red onion skins: Reddish brown color
Red cabbage: Blueish color
Coffee: Brown color
Beets: Pink color
Turmeric: Yellow egg

I can only vouch for the onion skins.  I used mostly yellow onion skins and a few red onion skins to get the eggs the color in the picture at the top.  I was pretty impressed with the whole process.  Four of the eggs I put straight into the color, then four of the eggs I put various items around, one had mint leaves, one had rosemary leaves, one had oregano leaves, and one had rice, then I wrapped them in gauze and tied the ends to keep it in place.   Yes, I know I only used 8 eggs, but that was all I had.  Easter crept up on me this year.

To make the color, here is what you need:

Outer skins from 10-15 yellow onions
4 1/2 cups of water
2 tablespoons of white vinegar

You mix all this in a large pot, making sure it is a pan that won’t stain from the color.  Bring it to a boil, then cover and turn the heat to low to simmer for 20 minutes.  The water will become a red-orange color.  Next, carefully add the eggs to the pot, nestling them underneath the onion skins and making sure they are fully covered by the colored water.  I used a slotted spoon to lower them in the pot.

Cover the pot again, keep the heat on low, and simmer with the eggs in for 20-30 minutes.  Remove from heat and check the color.  If they are not yet the desired color, keep covered as they cool and then move to the refrigerator until they reach your desired color.  I found that mine needed about 20 minutes more after being removed from heat to get the color I wanted, I didn’t have to put them in the refrigerator.  Use a slotted spoon to carefully remove the eggs from the pot and put on wire racks to cool and dry.  Remove the gauze and pattern items.

Once they are cool, rub butter or vegetable oil over the eggs to give them a shiny finish.  Then, you are set to play the egg game and enjoy the hard-boiled eggs!