Archive | Cooking RSS feed for this section

Taco Biscuit Bowls

4 Jun

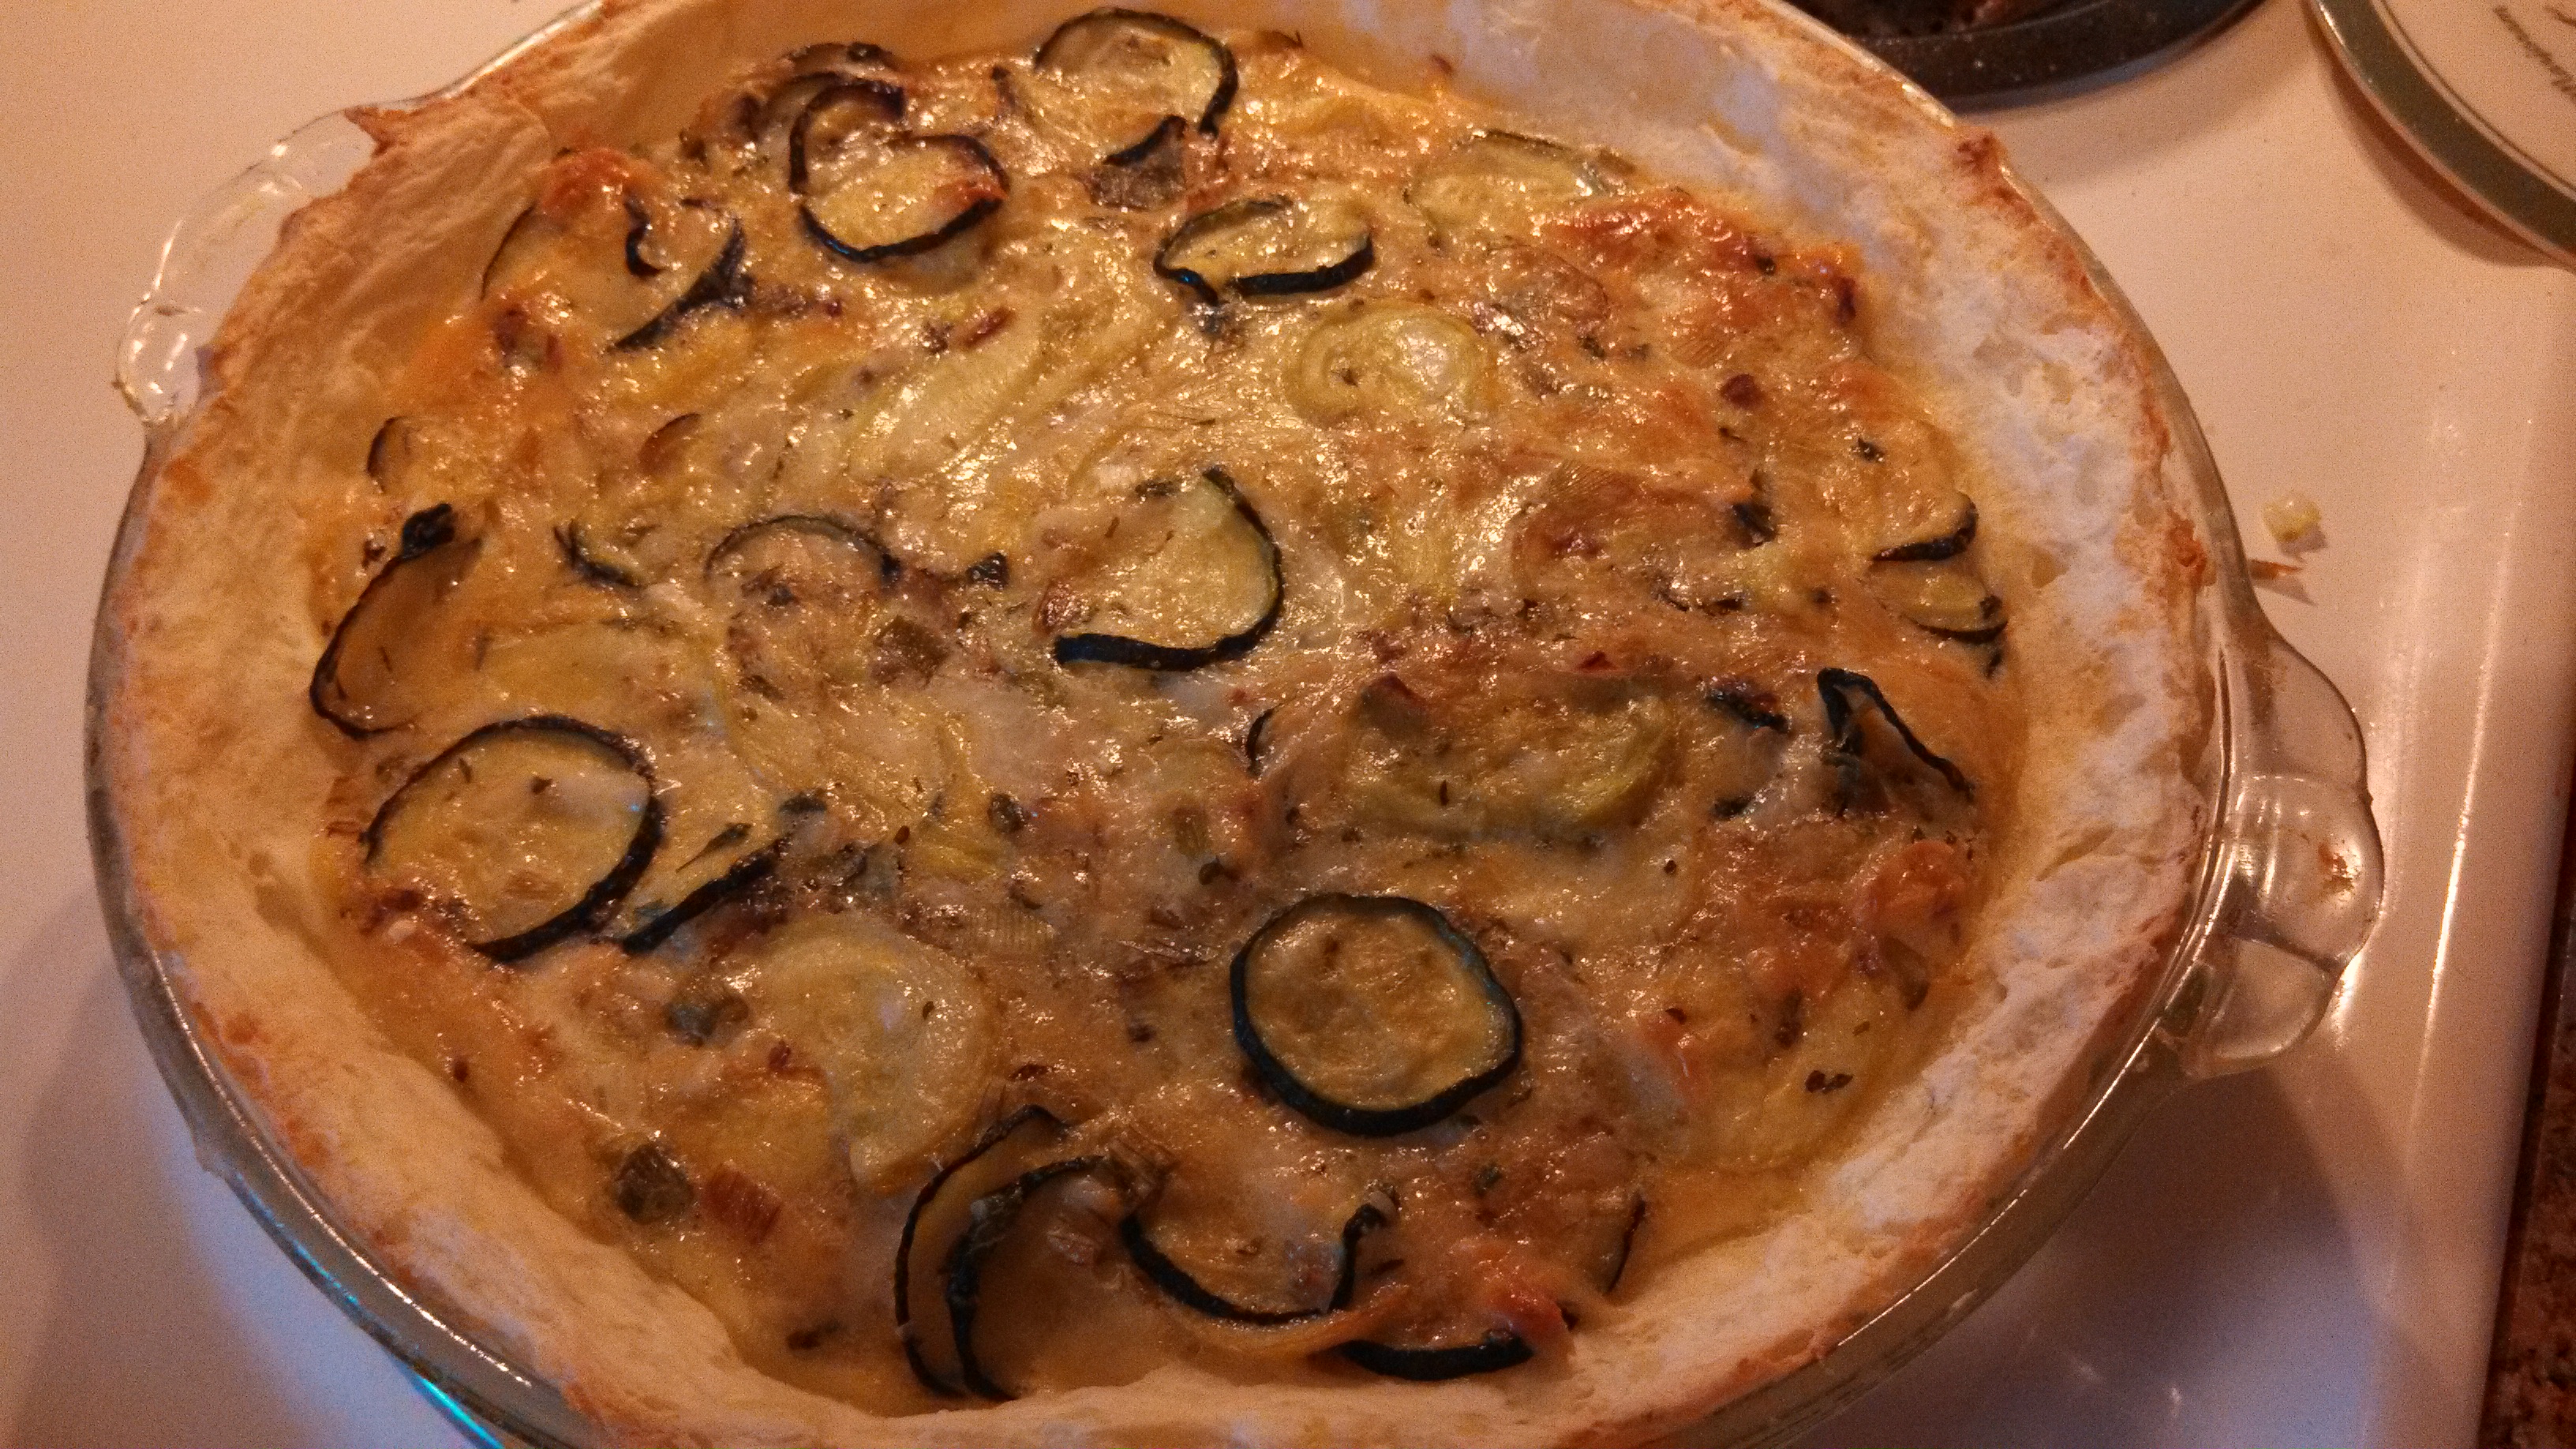
Recently, Grands biscuits were on sale for $0.99 each, so I picked up a couple of cans.   I know, I know, I’ve been really good about making my own biscuits, but some nights I do still like to have the convenience items.  I’ve had biscuit bowls a couple of times eating out, but haven’t tried making them yet.  There are a few ways to go about it, like baking the biscuits bowl first, then adding your fillings.  However, I decided to bake the biscuit bowl with the filling in it, and tonight, based on what I had, I decided on making a taco filling and serve it with a side of Spanish Rice.  I think the taco was good, but I would prefer finding maybe a corn meal crust to use with this instead.  Also, I’m already thinking of the next filling for the biscuit bowls, I think it will be more of a breakfast bowl, with sausage crumbles, scrambled eggs, onion, cheese, maybe some kind of veggies.  I’m getting hungry again just thinking about it!  I’ll update when I do make them that way.  I baked these in my 2 cup glass Pyrex bakeware.  These haven’t been used to bake before, usually I just use them for storage or when I make pudding.

Taco Biscuit Bowl


Taco Biscuit Bowl

What you need:

1 can Grands biscuits
1 pound ground beef
2/3 cup water
2 tablespoons chili powder
1 teaspoon cumin
1/2 teaspoon onion powder
1/2 teaspoon garlic powder
1/2 teaspoon oregano
1/4 teaspoon salt
1 cup salsa
1 cup cheese

How to make it:

Preheat the oven to 400 F.

In a large skillet, brown  the ground beef.  Stir in water and chili powder, cumin, onion powder, garlic powder, oregano, and salt.  Stir well.  Reduce heat to low and simmer for 10-15 minutes.

Meanwhile, spray 4 2-cup glass baking dishes with cooking spray.  Take 2 biscuits and press into the bottom and sides of one of the dishes.  Repeat for the other 3 baking dishes.  Next, fill with the seasoned ground beef.  Then, top each with the salsa and the cheese.

Line a baking sheet with aluminum foil and put each of the baking dishes on the baking sheet.  Bake in the preheated oven for 15-20 minutes, or until the biscuits become golden brown.  Remove and allow to cool a few minutes before serving.

Lentil Salad

24 May

I had tried a lentil salad from a local vendor, and decided I wanted to try and make my own.  I usually use lentils in soups, so I was excited to try a salad.  Like pasta salad, Lentil Salad could be done a ton of different ways.  I’m already thinking about what combinations to try next, like maybe tomatoes, olives, and feta cheese.  Plus, lentils are very good for you too.  Always great when something tastes good and is good for you!

Lentil Salad


Lentil Salad

What you need:

1 cup lentils (I used Palouse Brand Spanish Pardina Lentils)
1/2 cup seeded and chopped  mini sweet peppers or bell pepper
1/2 cup cucumber, cut in small chunks
1/2 cup cherry tomatoes, seeded and diced
1 bunch green onion, diced
1 tablespoon fresh parsley, minced
1/4 cup grated Parmesan cheese
1/2 cup olive oil
1/2 cup red wine vinegar
1/2 teaspoon garlic powder
1/2 teaspoon Italian blend seasoning
1/4 teaspoon salt
1/8 teaspoon ground black pepper

How to make it:

Rinse lentils and drain.  Place lentils in a medium sauce pan with 3 cups of water.  Bring to a boil, then reduce heat to simmer.  Cover and cook for 30 minutes, or until lentils are tender.  Drain.  Run cold water over lentils and drain.  Allow to cool for a few minutes.

Place cooled lentils in a large bowl.  Add peppers, cucumber, tomatoes, green onion, parsley, and Parmesan cheese.   Mix together.

Whisk together olive oil, red wine vinegar, garlic powder, Italian blend seasoning, salt, and pepper to make the vinaigrette.

Pour the vinaigrette over the lentils and vegetables.  Mix in well to fully coat.  Cover and refrigerate before serving.

Zucchini & Yellow Squash Quiche with Mashed Potato Crust

14 May

What do you do when you don’t want to make a regular pie crust for a quiche?  Make one with mashed potatoes!  I had made a similar quiche a while back, but used broccoli as the vegetable.  Since I have a few bags of zucchini and yellow squash in the freezer, I decided to use that.  I also used up the last of my shredded mozzarella cheese from Basicfarm7.  It’s a great way to use up leftover mashed potatoes and then add in your favorite veggie, meat, and cheese combination.  Think broccoli, spinach, ham, bacon, cheddar cheese, etc.  Not all together of course, but ideas for ingredients to use in different combinations!  Or, when you have leftovers at Thanksgiving, use leftover mashed potatoes for the crust, and have chopped turkey and cheese for the filling!

Zucchini & Yellow Squash Quiche with Mashed Potato Crust


Zucchini &Yellow Squash Quiche with Mashed Potato Crust

What you need:

For the crust:
2 cups mashed potatoes OR about 2 pounds of potatoes, peeled, boiled, mashed and mixed with 1/4 milk
Olive oil

For the filling:

1/4 olive oil
2 cups zucchini and yellow squash
1/2 cup chopped onion
2 tablespoons chopped fresh parsley or 1 tablespoon dried parsley flakes
1/4 teaspoon dried basil
1/4 teaspoon dried oregano
3 eggs, beaten
2 cups shredded mozzarella cheese
Salt and pepper

How to make it:

Preheat oven to 350 F.

Lightly oil a 9″ deep dish pie plate.  Press mashed potatoes into the bottom and sides of the pie plate.  Brush with more olive oil.  Bake in the preheated oven for 30 minutes until golden brown.

Meanwhile, heat olive oil in a large skillet over medium heat.  Add zucchini, yellow squash, and onion to the skillet, and cook until soft.  Stir in parsley, basil, oregano, salt and pepper.  Remove from heat.

In a bowl, mix together the beaten eggs and shredded cheese.  Stir in the zucchini and yellow squash mixture.  Pour into the mashed potato crust.  Return to oven and bake for 25-30 minutes, or until a knife inserted in the center comes out clean.

Farmer’s Market Finds: 5/9/2013

9 May

I haven’t made it to the Farmer’s Market in a long time!  It does run year round here, but I just haven’t found the time to make it.  Today, I finally made it back and also picked up some things from a friend’s farm as well.  She is going to be at the Community Market on Saturday, but I’m not able to make it then, so I met her today.

So, I’ll start with the items from Christie, from Basicfarm7.

Food from Basicfarm7I got 1 dozen fresh eggs, onions, feta cheese, and mozzarella.  I had almost half the feta crumbled on a salad for lunch (I LOVE feta!).  I chopped up a red onion and some of the greens to add to my stuffed shells filling that we had for dinner tonight.  I also grated one bag of the mozzarella for the filling and over the top of the stuffed shells as well.  The rest of the mozzarella, another onion, and an egg will go into making a Sausage & Potato Pie.  So excited as it’s been a while since I made it.

Then, later in the day, I headed to the Farmer’s Market.  Not much, but it was nice to walk around and see what was available.

Farmer's Market Finds


The maple syrup is pure maple syrup brought in from New York.  It looks really good, and I can’t wait to try it out on pancakes and waffles.  Then, I also got 2 books written by Suzanne M. Malpass.  She has written four books that are true stories about animals and have happy endings. Plus, they have wonderful illustrations.  A Lab’s Tale is for us to keep, and Colorado, The Flying Horse is for my friend’s daughter who loves horses.  Suzanne was there today and signed these books for me. To find out more about Suzanne and her books, you can visit Straddlebooks.com.  She will be selling them at a festival in St. David, AZ, this weekend, and then is headed back north for the summer. You can also find her books online, but if you buy them in person, she will sign them as well, which is neat.  My older daughter read A Lab’s Tale for her nightly reading log for school, and she really enjoyed the story.

Hopefully, I will get to check out the Farmer’s Market more in the weeks to come, instead of going months in between!


Slow Cooker Chicken and Dumplings

2 May

Slow Cooker Chicken and Dumplings


This is something I have made for a long time.  But, my challenge tonight was to make it gluten-free for my friend’s kids that I was watching tonight.  Normally, I make the Bisquick biscuit recipe on the box and drop it in, but tonight I used a biscuit recipe using flour so I could substitute in the gluten-free all-purpose flour that I have.  With the Bisquick, the dumplings end up pretty fluffy and it’s almost more like a chicken pot pie.  This time, it turned out more like dumplings, and was pretty good!  So, now this can be made with regular flour or gluten-free flour with good results.


Slow Cooker Chicken and Dumplings

What you need:

2 pounds boneless, skinless chicken breast
1 bag (12 oz) mixed vegetables (I used a mix of carrots, corn, green beans, and peas)
1 cup diced onion
8 cups water
6 chicken bouillon cubes (make sure to use gluten-free, if needed)
1 teaspoon poultry seasoning
2 cups all-purpose gluten-free flour with xanthan gum or 2 cups all-purpose wheat flour, depending on your need
2 1/2 teaspoons baking powder
1/2 cup vegetable oil
1 cup milk

How to make it:

Spray slow cooker with non-stick spray. Add chicken, vegetables, onion, water, chicken bouillon, and poultry seasoning. Cook on low for 6-8 hours or high for 3-4 hours. Remove chicken, shred, and return to crock pot. If cooked on low, turn to high for 15 minutes.

Mix together flour, baking powder, oil, and milk.  Drop dough by spoonfuls into the slow cooker.  Cook on high 30 minutes more or until dumplings have cooked.

Note: For the dumplings, you can also use regular or gluten-free Bisquick to make biscuit dough according to the box, then drop by spoonfuls into the slow cooler. If you don’t need gluten-free, you can use a can of refrigerated biscuit dough. Cut each biscuit into fourths and roll into balls, then drop then into the slow cooler.

Adventures in Coconut Macaroons

1 May

I say adventures because for me it has been an adventure making these coconut macaroons!  I had gotten 2 coconuts from Bountiful Baskets, which were a lot of work to prep.  First, I poked a hole in each coconut in one of the eyes to get out the coconut water.  Once each was drained, I then tapped around it with the back of a heavy knife (not the sharp side).  Then, I used a knife to pull the meat away from the shell.  There are a few different methods to do all this, and this article, 8 Ways to Open a Coconut, explains it well with lots of pictures.

Once I got the meat of the coconut, I left the husk  on (lighter brown part) ran each one through my food processor.  I considered hand grating it, but decided the food processor would be fine.  I got it fairly fine like this:

Coconut through the food processor

Then, it sat in the refrigerator a few days until I could get to it again!  When I had time, I got out one container (each coconut yielded approximately 3 cups of grated coconut) and started on a coconut macaroon recipe that was straightforward and easy.  And, the first pan turned out like this:

Mushy coconut macaroonsGooey, stuck to the parchment paper, overly sweet coconut macaroons.  Boo!  It was too runny, probably because of the moisture content of the fresh coconut.  The other half of that batter I put in the fridge overnight.  The next morning, I put it in a small saucepan over medium-low heat, stirred constantly, for about 15 minutes.  That yielded macaroons that looked like this:

Fixed Coconut MacaroonsMuch better structure, but still too sweet, too much sugar. I still had 3 cups of coconut, so it was time for one last attempt.  This time, I started by toasting the coconut in a large skillet on the stove since I didn’t want to heat up my house too  much using the oven.

Toasting coconut on the stoveThen, I made sure to beat the egg whites well, halved the sugar, and this time got a much better result:

Finally, good Coconut Macaroons!

So, here is my final combination of ingredients and methods:

Coconut Macaroons

What you need:

3 cups fresh coconut, or 3 cups unsweetened coconut flakes
3 egg whites
1/2 cup sugar
1 teaspoon vanilla extract (make sure it is gluten-free, if needed)

How to make it:

Preheat oven to 350 F.

Toast coconut in a large skillet over medium-low heat, stirring frequently, for 15-20 minutes, or until coconut becomes slightly browned.  Remove from heat and set aside to cool.

In a medium bowl, whisk egg whites, sugar, and vanilla extract until frothy.   Stir in coconut until just moistened.

Line a baking sheet with parchment paper.  Use a small cookie scoop or a tablespoon to drop mixture into small balls onto parchment paper.  Bake in the preheated oven for 15-20 minutes, or until golden brown.

Refrigerator Dill Pickles

30 Apr

Recently, I’ve been able to get fresh dill in my Sunizona Family FarmBox.  Cucumbers have also been available through them, and on sale at the grocery store.  My husband and kids love pickles, and while I had made sweet Refrigerator Pickles before, my older daughter has decided she isn’t real fond of sweet pickles.  So, I decided to try dill pickles.  I am not a pickle fan at all, but I do really like these!

Refrigerator Dill Pickles


Refrigerator Dill Pickles

What you need:

2 pounds cucumbers, washed and cut in slices or quarters
1 1/2 cups white vinegar
2 cups hot water
1 tablespoon sugar
4 teaspoons salt
2 teaspoons mustard seeds
1 cup chopped fresh dill
4 garlic cloves, peeled and crushed

How to make it:

Make the brine by dissolving the sugar and salt in hot water.  Mix in white vinegar.

Divide the cucumbers, mustard seeds, fresh dill, and garlic between 2 quart size jars.  Shake or stir slightly to get the mixture evenly through the jars.

Pour brine into both jars, making sure the cucumbers are fully submerged.  Tightly cover with lids and place in refrigerator.  Allow to sit for 48 hours, and keep stored in the refrigerator.

Slow Cooker Roast with Potatoes and Carrots

28 Apr

Slow Cooker Roast with Potatoes and Carrots


I know this picture doesn’t make it look very appetizing, but it really turned out very good!  The roast was a chuck roast that I had purchased from Starbar Farm & Ranch.  When I used to make this, I would use a packet of onion soup, but since I didn’t have any on hand, I found a blend of spices online that was similar and without all the extra stuff too.  After the meat was cooked, I shredded it and mixed it in with the potatoes and carrots, making it like a beef stew.


Slow Cooker Roast with Potatoes and Carrots

What you need:

4-5 lb beef roast
2.5 lb potatoes, cut into 1 inch pieces (I left the skins on)
8 oz peeled baby carrots
1 onion, cut into wedges
4 teaspoons beef bouillon granules
3 tablespoons dried minced onion
1 teaspoon onion powder
1 teaspoon garlic powder
Salt and pepper
1 1/2 cups water

How to make it:

Place roast in slow cooker.  Place potatoes, carrots, and onions around the roast.

In a small bowl, combine beef bouillon, minced onion, onion powder, garlic powder, salt and pepper.  Sprinkle over roast and vegetables.

Pour the water over the vegetables that are around the roast.

Cook on low for 8-10 hours, or until meat can be pulled apart easily with a fork.

Spanish Rice

5 Apr

This has been on the to-do list for WAY too long.   I used to just buy a packet, add water, cook, and be done.  But, since I have been cutting back on as packaged foods as possible, I wanted to give this a try tonight since I had all the ingredients on hand.  It actually wasn’t too bad time-wise, just a little extra prep work.  And, it turned out really good, my husband was really impressed and he’s been hard to please lately!

Spanish RiceSpanish Rice

What you need:

2 tablespoons olive oil
1 cup long grain rice*
1 small onion, diced
2 cloves garlic, minced
2 cups chicken broth*
1 pound tomatoes, diced in food processor
2 teaspoons chili powder
1 teaspoon ground cumin
1/2 teaspoon oregano
1/2 teaspoon salt
*Note: Check the liquid to rice ratio recommended on the package of rice you are using and adjust rice and chicken broth quantity as needed

How to make it:

Heat olive oil in a large skillet over medium heat.  Pour rice into skillet to brown.  Stir in the onion and garlic, stirring continuously, until onions become translucent.

Meanwhile, add chicken broth, tomatoes, and all seasonings  to a medium saucepan.  Bring to a simmer.

Stir rice mixture into the liquid.  Bring to a boil, then reduce heat to low and cover.

Simmer while covered for 20-25 minutes, or until rice is fully cooked.

Chicken and Gnocchi Soup

31 Mar

This has been on my list of things to try making for a while.  Our main Olive Garden favorite is Zuppa Toscana, which I still make regularly, but I still wanted to give this one a try.  It is actually really easy to make and doesn’t take too long to make.  For the gnocchi, you have the option of buying at the store (usually in the pasta, refrigerated, or frozen section) or making your own.  I had a leftover baked potato in the fridge, so I decided I would try making my own.  It’s not too hard either, just a little time-consuming.  I’ll give the recipes for both.

Potato GnocchiPotato Gnocchi

What you need:

1 large russet potato, weighing about 1 pound
1 egg yolk
3/4 cup flour, plus more for work area
Pinch of salt

How to make it:

First, bake potatoes. I used a potato that I had baked in the slow cooker earlier in the week.  If you don’t have an already baked potato, preheat oven to 350 F.  Pierce potato with a fork all around potato.  Bake for about 1 hour, or until potato is very soft.  Remove potato to a rack and cut open to allow to cool.

Scoop out the insides of the potato and discard skins (or save skins for some other use).  Pass the potato through a potato ricer or run along a small grater.  Add the egg yolk, flour, and salt, and mix by hand until you get a ball of dough.

Flour your work area.  Take a small ball of the dough and gently roll on your work surface until you have a long roll about 3/4″ in diameter.  Cut off 1″ sections.  Roll each along the back of a fork to get small indentations in each piece.  Place on a cookie sheet lined with wax paper.

Potato Gnocchi waiting to be cookedAt this point, if you will not be using right away, place the cookie sheet in the freezer.  Once frozen, place gnocchi in a freezer safe bag or container until you will use.

To cook, bring a pot of salted water to a boil.  Gently add gnocchi, a few at a time, to the boiling water.  When they rise to the surface, use a slotted spoon to remove gnocchi.  Repeat for remaining gnocchi.  Serve with sauce or pesto, or set aside to add to soup below.


Chicken and Gnocchi SoupChicken & Gnocchi Soup

What you need:

1 lb chicken, cut into 1″ cubes (or 2 cups cooked chicken)
3 tablespoons butter
2 tablespoons olive oil
1 small onion, diced
1/2 cup chopped carrots
1/2 cup chopped celery
4 cloves garlic, minced
1/3 cup all-purpose flour
1 1/2 teaspoons dried basil
4 cups chicken broth
1 1/2 cups half and half (I just use 1% milk in all my soups, and it comes out fine)
1 pound potato gnocchi, made as above or cooked according to the package directions
3 cups coarsely chopped spinach leaves
Salt and black pepper to taste

How to make it:

Heat a little olive oil in a large pot over medium-high heat.  Add chicken, and cook until no longer pink inside and slightly browned outside.  Remove from pot and set aside.

Heat the 3 tablespoons butter and 2 tablespoons olive oil over medium heat.  Add the onions, carrots, celery, and garlic.  Cook until vegetables become tender, about 10 minutes.  Mix in the flour, basil, salt and pepper.  Stir continuously for about 5 minutes.

Slowly whisk in the chicken broth and half and half to prevent any lumps from forming.  Bring to a light boil, then reduce heat to low to simmer for 20 minutes, until soup thickens.

Add the cooked gnocchi and spinach to the soup.  Gently stir and cook until spinach wilts.  Serve immediately.